Sponsor

Security Videos

Entries in Malware (10)

Wednesday
Jan292014

Categorizing Maltrieve Output

UPDATE: @kylemaxwell has accepted the pull of this script into the main maltrieve repo!

*Note: For starters, we need to say thanks as usual to technoskald and point you in the right direction to the Maltrieve Code on GitHub.

Overview

We have posted Maltrieve articles a couple times in the past, but the capabilities of this application continue to amaze us so we thought we'd add to our past contributions. During our initial build of a malware collection box (malware zoo creation) we utilized a standard concept of running Maltrieve throughout the day using a cron job. As most simple things do, this became rather complex based on the fact that the Maltrieve delivery is not categorized in any method, so finding what you're looking for is.....shall we say.....difficult at best. This article discusses a categorization method to help you organize your malware zoo so that it is manageable.

If you would prefer this article in video format, it is provided as well:

Getting started

The box containing the malware repository is a standard Precise Pangolin Ubuntu Distro (12.04 LTS), so no big tricks or hooks here. Maltrieve is installed in a standard format, but a 1TB drive is being utilized to store the malware retrieved. The box has 3TB worth of space for later use, but for now we'll deal with just the 1TB drive. The malware repository is mounted at /media/malware/maltrievepulls. All scripts utilized (to include the Maltrieve python scripts) are located at /opt/maltrieve. Again, nothing flashy in any of this, so it should be easy for you to get your box setup quick if you'd like.

Running Maltrieve Consistently

To begin the build of the malware repository, we wanted to run the maltrieve scripts hourly so that the directory would fill with new and interesting malware consistently and quickly. This screamed “crontab”, so we fired up a terminal and ran sudo crontab -l and then sudo crontab -e so that we could edit the crontab. Our initial entry was as follows:

hourly python /opt/maltrieve/maltrieve.py -d /media/malware/maltrievepulls

@hourly echo "maltrieve run at: $(date) $(time)" >> /home/username/Documents/maltrievelog.log

This simply tells the system to run the maltrieve.py python script on an hourly basis and send the results to the /media/malware/maltrievepulls directory for safe storage. The second entry basically adds a little stamp in a file in my home directory so I can ensure the cron job is running every hour – you can obviously NOT include this statement if you don't see fit. In any case, we quickly noticed that the Maltrieve app was doing its job and we went about our business allowing the box to do what we asked. We quickly were swimming in malware and were ready to start analyzing to our hearts delight when we ran into the problem!

The Problem

Maltrieve does exactly what it's told and it does it well – find malware from specific sites and put it in a directory of your liking. And it finds LOTS OF MALWARE if you keep running it as we did in hopes of having a massive store. However, the files are given a hashed name that has very little use to the human eye, and they are just plopped merrily into the directory you choose when you run the malware.py python script. It became quite tedious to run the file command on files that just “looked” interesting based on a hashed filename that gave little meaning to what it might be in terms of formatting, or even payload. A quick look could allow you to do some judging by filesize, but basic command line sorting, grepping, awking, and loads of other tools were needed to try and fix the problem. These methods were simply tedious and after we began to have hundreds of GBs of malware, it became downright no fun any more. The picture below will show you a glimpse of the problem.

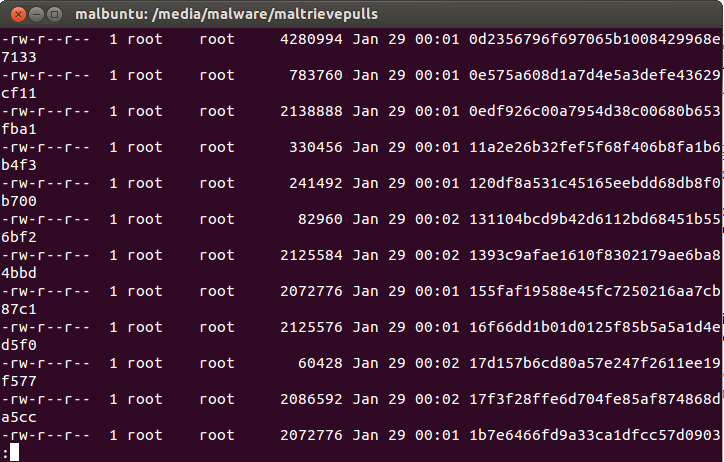
Hardly the beacon of light for finding what you're looking for from your malware repository.

Running the file command on a few of these things starts showing some potential though because what you get from doing this looks like:

file 818fc882dab3e682d83aabf3cb8b453b

818fc882dab3e682d83aabf3cb8b453b: PE32 executable (GUI) Intel 80386, for MS Windows


file fd8fd6d345cb630d7f1b6926ce7d28b3

fd8fd6d345cb630d7f1b6926ce7d28b3: Zip archive data, at least v1.0 to extract

So here we find that we have 2 pieces of malware, one is a Portable Executable for a Windows box and the other is a Zip archive. This is a very nice start, but was just 2 needles in a large and growing haystack, and the manual effort was laborious and downright daunting.

Bash to the Rescue

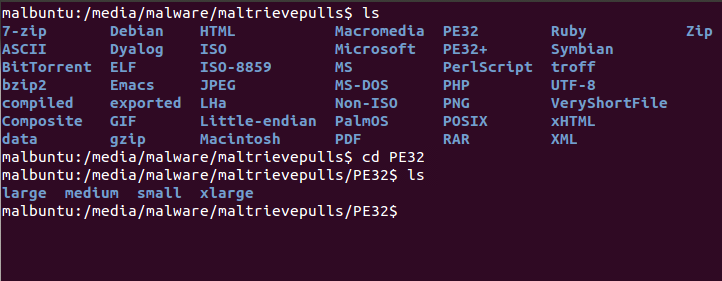
As coders love to do, our answer was to take the awesome product Maltrieve and throw some more code at it. My initial thought was to extend the python script, but since I pulled this from a GitHub repository I didn't want to modify the code and then have to “re-modify” it later if things were ever changed or upgraded. My answer was to create a small Bash Shell script and run it to help categorize our malware repository. The requirements we set upon ourselves were to categorize the code into multiple directories based on the first word output from the file command and then further categorize that by separating the code by size. We decided that 0-50KB files would be considered “small”, 51KB-1MB would be considered “medium”, 1.xMB-6MB would be considered “large”, and anything larger would be considered “xlarge”. It's a rather brutish method but it's something and it seems to work nicely. So in the end, we would want to see a directory tree that looked something like this:

--PE32

----small

----medium

----large

----xlarge

--Zip

----small

----medium

----large

----xlarge

and so on and so on.

Since we set up our maltrieve pulls to run hourly we decided to run the bash script - which we so obviously named maltrievecategorizer.sh – to run on every half hour, which allows maltrieve to finish and then categorizes the latest findings. To make this happen, we cracked open crontab again with sudo crontab -e and added the following to the end of the file:

30 * * * * bash /opt/maltrieve/maltrievecategorizer.sh

which just says to run our bash script on the half hour of every day of the year, plain and simple.

The Bash Script

The maltrievecategorizer.sh bash script can be seen below. An explanation follows the script.

#!/bin/sh


smallstr="/small"

mediumstr="/medium"

largestr="/large"

xlargestr="/xlarge"

smallfile=50001

mediumfile=1000001

largefile=6000001

root_dir="/media/malware/maltrievepulls/"

all_files="$root_dir*"

for file in $all_files

do

  if [ -f $file ]; then

    outstring=($(eval file $file))

    stringsubone="${outstring[1]}"

    case $stringsubone in

      "a") stringsubone="PerlScript";;

      "very") stringsubone="VeryShortFile";;

      "empty") rm $file

        continue;;

      *);;

    esac

    if [ ! -d $root_dir$stringsubone ]; then

      mkdir -p "$root_dir$stringsubone"

      mkdir -p "$root_dir$stringsubone$smallstr"

      mkdir -p "$root_dir$stringsubone$mediumstr"

      mkdir -p "$root_dir$stringsubone$largestr"

      mkdir -p "$root_dir$stringsubone$xlargestr"

    fi

    filesize=$(stat -c %s $file)

    if [[ "$filesize" -le "$smallfile" ]]; then

      mv $file "$root_dir$stringsubone$smallstr/"

    elif [[ "$filesize" -le "$mediumfile" ]]; then

      mv $file "$root_dir$stringsubone$mediumstr/"

    elif [[ "$filesize" -le "$largefile" ]]; then

      mv $file "$root_dir$stringsubone$largestr/"

    else

      mv $file "$root_dir$stringsubone$xlargestr/"

    fi

  fi

done

The first several lines simply create string literals for “small”, “medium”, “large”, and “xlarge” so we can use them later in the script, and then we create three variables “smallfile”, ”mediumfile”, and ”largefile” so we can compare file sizes later in the script. So far so good! The lines containing:

root_dir="/media/malware/maltrievepulls/"

all_files="$root_dir*"

for file in $all_files

do

if [ -f $file ]; then

do nothing more than set our root directory where our maltrieve root is and then run a loop against every file in that directory.

outstring=($(eval file $file))

Creates a variable called outstring that is an array of words representing the output of the file command. So using the file command output from above, the outstring array would have 818fc882dab3e682d83aabf3cb8b453b: PE32 executable (GUI) Intel 80386, for MS Windows in it. Each array element would be separated by the space in the statement, so outstring[0] would store: 818fc882dab3e682d83aabf3cb8b453b: and outstring[1] would store: PE32 and outstring[2] would store: executable and so on and so on. We are only interested in outstring[1] to make our categorization a possibility.


Our next line in the script

stringsubone="${outstring[1]}"


creates a variable named stringsubone that contains just the string held in outstring[1] so using the example above, stringsubone would now hold PE32.

The case statement you see next

case $stringsubone in

"a") stringsubone="PerlScript";;

"very") stringsubone="VeryShortFile";;

"empty") rm $file

continue;;

*);;

esac

fixes a couple problems with the file command's output. In the case of a piece of malware that is a Perl Script, the output that the file command provides is: a /usr/bin/perl\015 script. This may be helpful for a human, but it makes our stringsubone variable hold the letter “a” in it, which means we would be creating a directory later for categorization called “a” which is LESS THAN USEFUL. The same problem happens with something called Short Files where the output from the file command is: very short file (no magic) which means our stringsubone variable would hold the word “very” which isn't a great name for a directory either. The case statement takes care of these 2 and allows for a better naming method for these directories. It also allows for the removal of empty files which are found as well.

The next lines

if [ ! -d $root_dir$stringsubone ]; then

mkdir -p "$root_dir$stringsubone"

mkdir -p "$root_dir$stringsubone$smallstr"

mkdir -p "$root_dir$stringsubone$mediumstr"

mkdir -p "$root_dir$stringsubone$largestr"

mkdir -p "$root_dir$stringsubone$xlargestr"

fi

simply tell the script to look in the directory and if a directory that has the same name as stringsubone does not exist then create it. Then create the directory small, medium, large, and xlarge within that directory for further categorization. Using the PE32 example from above, basically this says “if there's no PE32 directory in this root directory, create one and create the sub-directories small, medium, large, and xlarge within that directory. If the PE32 directory already exists then do nothing”.

The remaining lines look difficult but are simple:

filesize=$(stat -c %s $file)

if [[ "$filesize" -le "$smallfile" ]]; then

mv $file "$root_dir$stringsubone$smallstr/"

elif [[ "$filesize" -le "$mediumfile" ]]; then

mv $file "$root_dir$stringsubone$mediumstr/"

elif [[ "$filesize" -le "$largefile" ]]; then

mv $file "$root_dir$stringsubone$largestr/"

else

mv $file "$root_dir$stringsubone$xlargestr/"

fi

fi

first we create a variable called filesize and then using the stat command, we store the file size in that variable. Then we find out if the file fits in our category of small, medium, large, or xlarge using if and elif comparison statements. Whichever comparison statement turns out to be correct is where the file is then successfully moved.


The results of this solution are in the picture below.


Conclusion

As you can plainly see, we now have the ability to quickly look for specific files in an easier fashion. If I am looking for a piece of malware that I know to be in HTML format that was over 50KB, but less than 1MB, I can easily roam to HTML->medium and a one-liner file command with some grepping and find what I am looking for. I'm certain there are other methods to go about this process and probably WAY better methods of categorizing this directory, so if you have some ideas please shoot them our way and we'll give them a try and see if we can help the community.


Sunday
Mar172013

Tektip ep25 - Static Malware Analysis With PEFRAME

In this episode of TekTip we cover using peframe to help with the automating of static analysis of Portable Executable (PE) files. While MASTIFF (which we covered extensively) will determine a file type and then based on the file type run the appropriate tools, peframe focuses specifically on PE files or what we generally consider standard windows executables. This focus allows peframe to pull out some great data that we don't see (at least not yet), in other static analysis frameworks.

Peframe was created by Gianni Amato (@guelfoweb) and added to the CAINE digital forensics distro.

Like MASTIFF peframe at its current release can only run against a single file at a time. The script I wrote to automate running MASTIFF against multiple files could be easily modified to do the same for peframe.

Installation for peframe is simple, just download the zip and extract to the directory you want to run it from, for me I chose /opt/peframe. The only dependencies I am aware of are python 2.7, and peid.

OPTIONS:
-h  --help This help
-a --auto Show Auto analysis
-i  --info PE file attributes
   --hash Hash MD5 & SHA1
   --meta Version info & metadata
   --peid PE Identifier Signature
   --antivm Anti Virtual Machine
   --antidbg Anti Debug | Disassembler
   --sections Section analyzer
 --functions Imported DLLs & API functions
 --suspicious Search for suspicious API & sections
 --dump Dumping all the information
 --strings Extract all the string
 --url Extract File Name and Url
 --hexdump Reverse Hex dump
 --import List Entry Import instances
 --export List Entry Export instances
 --resource List Entry Resource instances
 --debug List Entry DebugData instances

Example Usage:

For must the auto option will pull all the data needed.

tekmalinux@TekMALinux:/opt/peframe$ sudo python peframe.py --auto /opt/malware/e72f79a5399c84f11d954ce59e4186f2 

File Name: e72f79a5399c84f11d954ce59e4186f2

File Size: 752424 byte

Compile Time: 2013-02-26 17:35:54

DLL: False

Sections: 5

MD5   hash: e72f79a5399c84f11d954ce59e4186f2

SHA-1 hash: 8ed3ec95756f7be133f3e94309e0d22795f6da75

Packer: Microsoft Visual C++ 8

Anti Debug: Yes

Anti VM: None

File and URL:

FILE: ntdll.dll

FILE: kernel32.dll

FILE: s.dll

FILE: comctl32.dll

FILE: comdlg32.dll

FILE: shell32.dll

FILE: WININET.DLL

FILE: mfcm90.dll

FILE: user32.dll

FILE: ole32.dll

FILE: .com

FILE: .bat

FILE: .exe

FILE: USER32.DLL

FILE: OLEACC.dll

FILE: gdiplus.dll

FILE: RPCRT4.dll

FILE: VERSION.dll

FILE: KERNEL32.dll

FILE: USER32.dll

FILE: GDI32.dll

FILE: COMDLG32.dll

FILE: ADVAPI32.dll

FILE: SHELL32.dll

FILE: COMCTL32.dll

FILE: SHLWAPI.dll

FILE: oledlg.dll

FILE: ole32.dll

FILE: OLEAUT32.dll

FILE: urlmon.dll

FILE: WININET.dll

URL: http://schemas.microsoft.com/SMI/2005/WindowsSettings

FILE: Windows.Com

URL: http://crl.verisign.com/pca3.crl0

URL: https://www.verisign.com/cps0

URL: http://logo.verisign.com/vslogo.gif04

URL: http://ocsp.verisign.com0

URL: http://logo.verisign.com/vslogo.gif0

URL: https://www.verisign.com/rpa

URL: http://csc3-2010-crl.verisign.com/CSC3-2010.crl0D

URL: https://www.verisign.com/rpa0

URL: http://ocsp.verisign.com0

URL: http://csc3-2010-aia.verisign.com/CSC3-2010.cer0

URL: https://www.verisign.com/rpa

URL: http://csc3-2010-crl.verisign.com/CSC3-2010.crl0D

URL: https://www.verisign.com/rpa0

URL: http://ocsp.verisign.com0

URL: http://csc3-2010-aia.verisign.com/CSC3-2010.cer0

URL: https://www.verisign.com/rpa

URL: https://www.verisign.com/cps0

URL: https://www.verisign.com/rpa0

URL: http://logo.verisign.com/vslogo.gif04

URL: http://crl.verisign.com/pca3-g5.crl04

URL: http://ocsp.verisign.com0

URL: https://www.verisign.com/rpa

Suspicious API Functions:

Func. Name: GetFileAttributesA

Func. Name: GetFileSizeEx

Func. Name: GetModuleHandleW

Func. Name: UnhandledExceptionFilter

Func. Name: IsDebuggerPresent

Func. Name: GetDriveTypeA

Func. Name: GetCommandLineA

Func. Name: GetStartupInfoA

Func. Name: VirtualProtect

Func. Name: VirtualAlloc

Func. Name: ExitThread

Func. Name: CreateThread

Func. Name: FindNextFileA

Func. Name: CreateFileA

Func. Name: FindFirstFileA

Func. Name: GetFileSize

Func. Name: WriteFile

Func. Name: GetModuleFileNameW

Func. Name: GetModuleHandleA

Func. Name: CreateProcessA

Func. Name: GetTempFileNameA

Func. Name: DeleteFileA

Func. Name: CreateDirectoryA

Func. Name: GetTickCount

Func. Name: LoadLibraryA

Func. Name: LoadLibraryA

Func. Name: GetProcAddress

Func. Name: CreateToolhelp32Snapshot

Func. Name: Process32First

Func. Name: Process32Next

Func. Name: OpenProcess

Func. Name: TerminateProcess

Func. Name: GetTempPathA

Func. Name: GetModuleFileNameA

Func. Name: GetVersionExA

Func. Name: Sleep

Func. Name: FindResourceA

Func. Name: LockResource

Func. Name: CreateFileW

Func. Name: GetWindowThreadProcessId

Func. Name: SetWindowsHookExA

Func. Name: RegOpenKeyA

Func. Name: RegCreateKeyExA

Func. Name: RegCloseKey

Func. Name: RegEnumKeyA

Func. Name: RegDeleteKeyA

Func. Name: RegOpenKeyExA

Func. Name: ShellExecuteA

Func. Name: URLDownloadToFileA

Func. Name: InternetConnectA

Func. Name: HttpSendRequestA

Func. Name: InternetReadFile

Func. Name: InternetWriteFile

Func. Name: InternetOpenA

Func. Name: InternetCloseHandle

Func. Name: HttpQueryInfoA

Func. Name: InternetQueryDataAvailable

Func. Name: InternetQueryDataAvailable

Func. Name: InternetCrackUrlA

Suspicious API Anti-Debug:

Anti Debug: UnhandledExceptionFilter

Anti Debug: IsDebuggerPresent

Anti Debug: Process32First

Anti Debug: Process32Next

Anti Debug: TerminateProcess

Anti Debug: GetWindowThreadProcessId

Suspicious Sections:

InternalName: Setup.exe

FileVersion: 2.4.2

CompanyName: DownloadManager

ProductName: DownloadManager.exe

ProductVersion: 2.4.2

FileDescription: DownloadManager                  

OriginalFilename: Setup.exe

Translation: 0x0409 0x04e4

Now of course, if you don't want all the information that the auto option gives you can run the indivual options themselves. Additionally, you can use the --dump, --strings, --hexdump options to pull out more data if the auto option didn't give you what you want.

Overall, I think peframe is a great tool.  While it runs many of the tools that we see in other frameworks it also applies a little analytics to the results pointing out key data like, file names, urls, Anti Forensics techniques, and suspicious API calls.

Tuesday
Mar122013

Installing Cuckoo

In the first post of the Cuckoo Sandbox series, we will cover installation and basic configuration to get you started with automated dynamic malware analysis. 

Background

Cuckoobox is an open source platform for automated dynamic analysis written by Claudio Guarnieri (nex) for the Google Summer of Code project in 2010. In 2012, Cuckoo was sponsored by Rapid7's Magnificent7 program "due to [its] innovative approach to traditional malware analysis". Currently Cuckoo can analyze Windows Executables, DLLs, PDF's, Office Docs, and URLs. Each sample to be analyzed is run through its own "clean" virtual machine, execution is tracked, and after completion the virtual machine is reverted back to its original "clean" state. A detailed report of the behavior the sample produced is generated and cataloged for later review. The system is written in Python and is very modular so it could be leveraged in other frameworks as well as extended for additional analysis or reporting. 

Installation

Cuckoo has EXCELLENT documentation so check there for any questions that may arise after running through this installation. There is also an IRC channel (#cuckoosandbox on freenode) and community question portal for additional help. 

As with the MASTIFF installation I am assuming a base installation of Ubuntu 12.10. As always the first step I perform is ensure that I have a fully updated system and have openssh installed for remote management. 

sudo apt-get update; sudo apt-get upgrade -y; sudo apt-get dist-upgrade -y; sudo apt-get autoremove -y; sudo apt-get install openssh-server -y; sudo shutdown -r now later

Next we will begin the installation of the required dependencies.

sudo apt-get install python python-dev python-sqlalchemy python-dpkt python-jinja2 python-magic python-pymongo python-bottle -y

It is also recommended to install python-pefile, this could be accomplished by installing pefile from the apt repo or from source. I mention this as MASTIFF required pefile to be built from source. If both applications will be installed on the same machine I recommend going with the source option. 

PEfile from APT

sudo apt-get install python-pefile

PEfile from source 

cd /opt
svn checkout http://pefile.googlecode.com/svn/trunk/ pefile
cd /opt/pefile
python setup.py build
sudo python setup.py build install
Next we need to install pydeep for ssdeep fuzzy hashes of samples.
sudo apt-get install build-essential git libpcre3 libpcre3-dev libpcre++-dev -y
cd /opt/
wget http://sourceforge.net/projects/ssdeep/files/ssdeep-2.9/ssdeep-2.9.tar.gz
tar -xvzf ssdeep-2.9.tar.gz
rm -f ssdeep-2.9.tar.gz
mv ssdeep-2.9 ssdeep
cd /opt/ssdeep/
./configure
make
sudo make install
sudo ldconfig
cd /opt/
git clone https://github.com/kbandla/pydeep.git pydeep
cd /opt/pydeep/
https://github.com/kbandla/pydeep.git
python setup.py build
sudo python setup.py install
Yara and Yara Python also need to be installed for Yara signature analysis.
sudo apt-get install automake -y
cd /opt
svn checkout http://yara-project.googlecode.com/svn/trunk/ yara
cd /opt/yara
sudo ln -s /usr/bin/aclocal-1.11 /usr/bin/aclocal-1.12
./configure
make
sudo make install
cd yara-python
python setup.py build
sudo python setup.py install
We need to install tcpdump in order to dump network traffic occurring during analysis. 
sudo apt-get install tcpdump
To ensure we do not need to run Cuckoo as root we need to set Linux capabilities for tcpdump.
sudo setcap cap_net_raw,cap_net_admin=eip /usr/sbin/tcpdump
Since Cuckoo leverages virtualization we will need to install a virtualization hypervisor. Since version 0.4 Cuckoo has been architecturally independent from the virtualization software. This means Cuckoo can leverage KVM, Virtualbox, or VMware as the hypervisor and could potentially be extended for use with other hypervisors. That being said THIS guide will focus on installation with VirtualBox for simplicity. However, there are pros and cons for each hypervisor that need to be taken into account for your specific environment. The following will document installing the latest version (as of this writing) of VirtualBox. 
sudo apt-get install libqt4-opengl libsdl1.2debian -y
wget http://download.virtualbox.org/virtualbox/4.2.8/virtualbox-4.2_4.2.8-83876~Ubuntu~quantal_amd64.deb
wget http://download.virtualbox.org/virtualbox/4.2.8/Oracle_VM_VirtualBox_Extension_
Pack-4.2.8-83876.vbox-extpack
sudo dpkg -i virtualbox-4.2_4.2.8-83876~Ubuntu~quantal_amd64.deb
sudo VBoxManage extpack install Oracle_VM_VirtualBox_Extension_Pack-4.2.8-83876.vbox-extpack
sudo /etc/init.d/vboxdrv setup
Now that VirtualBox is installed, create a user for cuckoo to utilize
sudo useradd cuckoo
sudo usermod -g vboxusers cuckoo
Now we are ready to pull down Cuckoo
git clone https://github.com/cuckoobox/cuckoo.git cuckoo
Thats it! Now we need to configure Cuckoo and create some analysis VMs. Change directories into /opt/cuckoo/conf. You will notice there are a few files, we will concern ourselves with three of them: cuckoo.conf, virtualbox.conf, and reporting.conf. First up cuckoo.conf - there is not much to change here if you are working with VirtualBox. The only thing you will need to do is specify some database credentials if you want to utilize something other than the default sqlite. I prefer mysql so I will install and configure that.
sudo apt-get install mysql-server python-mysqldb -y
mysql -u root -p
create database cuckoo;
grant all privileges on cuckoo.* to cuckoo@localhost identified by 'Cuck00@n@lyst!' ;
flush privileges;
quit;
Once  mysql is installed edit cuckoo.conf to reflect the database connection parameters you configured above, in this add  mysql://cuckoo:Cuck00@n@lyst!@localhost/cuckoo to the connection line under database.
Next we will look at virtualbox.conf.
[virtualbox]
mode = gui
path = /usr/bin/VBoxManage
machines = cuckoonode01, cuckoonode02, cuckoonode10,cuckoonode20
[cuckoonode01]
label = cuckoonode01
platform = windows
ip = 192.168.56.101
[cuckoonode02]
label = cuckoonode02
platform = windows
ip = 192.168.56.102
[cuckoonode10]
label = cuckoonode10
platform = darwin
ip = 192.168.56.110
[cuckoonode20]
label = cuckoonode20
platform = linux
ip = 192.168.56.120
The mode defaults to gui which means that you will be able to see the VirtualBox guest as the malware is executed. This option can also be changed to headless if you do not wish to see the VM. Next you will see the virtual machines directive. This is a comma separated list for each virtual machine that will be defined beneath the virtual machine list. Finally the details of the individual VMs are supplied. Platform can be either Windows, Darwin, or Linux. The IP address of the VM MUST be static as cuckoo needs to know this prior to booting the machine.


The last configuration file we need to concern ourselves with is the reporting.conf. This file contains the format of the reports that will be produced upon completion of analyzing a sample. By default the only output options that are enabled are jsondump and reporthtml. This is enough to produce a nice web report but I also like to enable the hpfclient option as well. If you haven't heard about hpfeeds, it is definitely worth the research. Setting up hpfeeds will be the topic of another blog post in the near future.


We are now done with the configuration of CuckooBox. We still need to build an analysis platform prior to submitting any samples. The installation and configuration of a "victim" machine / analysis platform is outside of the scope of this blog post. I will however briefly describe the steps necessary to build out a functioning VM for use in Cuckoo.
  • Install Windows XP SP3 or Windows 7 with UAC disabled
  • Disable Windows Firewall
  • Configure the network
    • Set a static IP address in the network range of the vboxnet0 (default host only network)
    • Configure iptables
      • sudo iptables -A FORWARD -o eth0 -i vboxnet0 -s 192.168.56.0/24 -m conntrack --ctstate NEW -j ACCEPT
      • sudo iptables -A FORWARD -m conntrack --ctstate ESTABLISHED,RELATED -j ACCEPT
      • sudo iptables -A POSTROUTING -t nat -j MASQUERADE
    • Enable forwarding
      • sudo sysctl -w net.ipv4.ip_forward=1
      • sudo sysctl -p
  • Rename VM based on virtualbox.conf
  • Install Python 2.7
  • Install Python Imaging Library 1.7 for Python 2.7 
  • Install additional software (not required but recommended)
    • Microsoft Office
    • Adobe Reader
    • Additional browsers
    • etc
  • Install the Cuckoo agent.py
    • Download from \\vboxsvr\ TEMPORARY share (remove prior to snapshot)
    • cd /opt/cuckoo/agent; python -m SimpleHTTPServer - and download to VM
    • Save/Rename agent.py to agent.pyw if you do not want the terminal window present
  • Execute agent.pyw
  • Snapshot the VM
    • VBoxManage snapshot "cuckoonode01" take "pristine" --pause
    • VBoxManage controlvm "cuckoonode01" poweroff
    • VBoxManage snapshot "cuckoonode01" restorecurrent
We are now done with the first analysis platform. To save time, this process can be simplified to a clone operation. Once the clone of the template is complete you will need to make a few small modifications:
  • Rename the VM (based on virtualbox.conf)
  • ReIP the machine (based on virtualbox.conf)
  • Stop the process associated with agent.py and reexecute agent.pyw
  • Take a new "pristine" snapshot using the steps outlined above
For the next step I recommend installing tmux or screen to manage cuckoo in one terminal (especially if you are remotely managing the machine).
sudo apt-get install tmux -y
tmux
cd /opt/cuckoo
Next start cuckoo with the following
python cuckoo.py
If you do not receive any errors and the status message indicates one or more VMs are loaded you are good to go. Open another screen in tmux (<ctrl>+b).
cd /opt/cuckoo/utils
python web.py
This should launch a web server on port 8080 for all interfaces. The web utility is a simple interface that will allow you to view the reports of submitted samples (clicking browse) and will also let you submit individual samples for processing. If you are adding multiple samples for processing it is best to utilize the submit.py utility. By default you can submit:
  • Windows PEs
  • DLLs
  • PDFs
  • Office Documents
  • URLs
usage: submit.py [-h] [--url] [--package PACKAGE] [--custom CUSTOM]
                 [--timeout TIMEOUT] [--options OPTIONS] [--priority PRIORITY]
                 [--machine MACHINE] [--platform PLATFORM] [--memory]
                 [--enforce-timeout]
                 target
positional arguments:
  target               URL, path to the file or folder to analyze
optional arguments:
  -h, --help           show this help message and exit
  --url                Specify whether the target is an URL
  --package PACKAGE    Specify an analysis package
  --custom CUSTOM      Specify any custom value
  --timeout TIMEOUT    Specify an analysis timeout
  --options OPTIONS    Specify options for the analysis package (e.g.
                       "name=value,name2=value2")
  --priority PRIORITY  Specify a priority for the analysis represented by an
                       integer
  --machine MACHINE    Specify the identifier of a machine you want to use
  --platform PLATFORM  Specify the operating system platform you want to use
                       (windows/darwin/linux)
  --memory             Enable to take a memory dump of the analysis machine
  --enforce-timeout    Enable to force the analysis to run for the full
                       timeout period
The options above provide a lot of flexibility to script the submission process, but it is as simple as
python submit.py --url http://www.tekdefense.com
python submit.py malware.exe
python submit.py malware.pdf
python submit.py malware.doc
Simple right? The above would have produced 4 entries in the submission queue. If there are more entries in the queue than machines available for processing, the sample will be submitted as soon as a VM is freed up and returned to its pristine state. It is also possible to pass a directory containing samples to submit.py. This will cause all samples contained within the directory to be processed. It is very powerful when used in conjunction with delete_original = on in the cuckoo.conf. Adding a large number of samples to the directory and deleting them after processing (copies are contained in storage/analyses/<sample number>). This approach is nice when using something like maltrieve and cron. 

Another nice utility is community.py also found in /opt/cuckoo/utils which will allow you to download the community signatures, machine manager, reporting, and processing modules. 

Cuckoo is an awesome product well worth the small amount of time you will need to invest to get it installed and configured. The amount of data that can be attained with it is astonishing and it can definitely help to speed up some of that analysis or at least help in determining which samples you should devote more of your precious time to.
Cheers
Sunday
Mar102013

Installing MASTIFF

So we have talked about using SecShoggoth 's MASTIFF (here, here, and here), but haven't really gone through the installation. Here goes...

I am assuming a base installation of Ubuntu 12.10 (because its easy and you can run it free on AWS). The first thing that we should do is update the base OS and install ssh for remote management.

sudo apt-get update; sudo apt-get upgrade -y; sudo apt-get dist-upgrade -y; sudo apt-get autoremove -y; sudo apt-get install openssh-server -y; sudo shutdown -r now later

Once that is back online we will begin installing the necessary packages for MASTIFF. I am running through the dependencies as they are introduced in the documentation. First lets get the python dependencies out of the way, as well as an editor (nano is fine...albeit evil)

sudo apt-get install python python-dev python-magic python-sqlite python-setuptools python-pip build-essential vim -y 

Install yapsy from pip

sudo pip install yapsy
Now, I tend to pull the majority of my software to /opt out of habit. You do not need to do the same but if you change the location be sure to update to commands below. First I will ensure that the user and group that I am currently using have access to /opt so I can write to that directory.
sudo chown -R `whoami`:`groups | awk '{print $1}'` /opt
Install TrID, download and run the TrID database updater.
cd /opt
mkdir /opt/trid
cd /opt/trid
wget wget http://mark0.net/download/trid_linux.zip
unzip trid_linux.zip
rm -f unzip trid_linux.zip
chmod +x trid
wget http://goo.gl/RQXV8
unzip RQXV8
rm -f RQXV8
chmod +x tridupdate.py
python tridupdate.py
*Note* if you are running this on a 64 bit machine you will need to install ia32-libs
sudo aptitude install ia32-libs
Next we will pull the dependencies down for ssdeep and pyssdeep and then install those packages
sudo apt-get install subversion libpcre3 libpcre3-dev libpcre++-dev -y
cd /opt/
wget http://sourceforge.net/projects/ssdeep/files/ssdeep-2.9/ssdeep-2.9.tar.gz
tar -xvzf ssdeep-2.9.tar.gz
rm -f ssdeep-2.9.tar.gz
mv ssdeep-2.9 ssdeep
cd /opt/ssdeep
./configure
make
sudo make install
sudo ldconfig
svn checkout http://pyssdeep.googlecode.com/svn/trunk/ pyssdeep
cd /opt/ssdeep/pyssdeep
python setup.py build
sudo python setup.py install
Next up is automake and yara:
sudo apt-get install automake -y
cd /opt
svn checkout http://yara-project.googlecode.com/svn/trunk/ yara
cd /opt/yara
sudo ln -s /usr/bin/aclocal-1.11 /usr/bin/aclocal-1.12
./configure
make
sudo make install
cd yara-python
python setup.py build
sudo python setup.py install
Now install simplejson from soure (NOT the APT repo)
sudo apt-get install git -y
cd /opt
git clone https://github.com/simplejson/simplejson simplejson
cd /opt/simplejson
python setup.py build
sudo python setup.py build install
Pull down Didier Stevens awesome pdf tools
mkdir /opt/pdftools
cd /opt/pdftools
wget http://didierstevens.com/files/software/pdf-parser_V0_3_9.zip
unzip pdf-parser_V0_3_9.zip
rm -f pdf-parser_V0_3_9.zip
chmod +x pdf-parser.py
wget http://didierstevens.com/files/software/pdfid_v0_0_12.zip
unzip pdfid_v0_0_12.zip
rm -f pdfid_v0_0_12.zip
chmod +x pdfid.py
Exiftool
cd /opt
wget http://www.sno.phy.queensu.ca/~phil/exiftool/Image-ExifTool-9.22.tar.gz
tar -xvzf Image-ExifTool-9.22.tar.gz
rm Image-ExifTool-9.22.tar.gz
mv Image-ExifTool-9.22 exiftool
PE-File (again NOT from the apt repo)
cd /opt
svn checkout http://pefile.googlecode.com/svn/trunk/ pefile
cd /opt/pefile
python setup.py build
sudo python setup.py build install
Disitool
mkdir /opt/disitool
cd /opt/disitool
wget http://www.didierstevens.com/files/software/disitool_v0_3.zip
unzip disitool_v0_3.zip
rm disitool_v0_3.zip
Openssl
sudo apt-get install openssl -y
pyOLEScanner
mkdir /opt/pyOLEScanner
cd /opt/pyOLEScanner
wget https://github.com/Evilcry/PythonScripts/raw/master/pyOLEScanner.zip
unzip pyOLEScanner.zip
rm pyOLEScanner.zip
chmod +x pyOLEScanner.py
Distorm
cd /opt
svn checkout http://distorm.googlecode.com/svn/trunk/ distorm
cd /opt/distorm
python setup.py build
sudo python setup.py build install
And finally MASTIFF itself
cd /opt
wget http://downloads.sourceforge.net/project/mastiff/mastiff/0.5.0/mastiff-0.5.0.tar.gz
tar -xvzf mastiff-0.5.0.tar.gz
rm mastiff-0.5.0.tar.gz
mv mastiff-0.5.0/ mastiff
cd /opt/mastiff
sudo make install
Now that MASTIFF is good to go we will want to ensure that the config file is created / edited properly. Ensure that you read through the config file as you will want to add the appropriate VirusTotal API key. Also if you installed the dependencies to different locations now is the time to correct those paths. 
mkdir /etc/mastiff
cd /etc/mastiff
 cat > /opt/mastiff/mastiff.conf.TEST <<EOF
# This is the configuration file for mastiff.
#
# Comments are preceded by a # or ;
#
[Dir]
# log_dir is the base directory where the logs generated will
# be placed in.
#log_dir = /usr/local/mastiff/log
log_dir = ./work/log
# plugin_dir is a list of directories plugins may be present in.
# should be comma-separated.
plugin_dir = ./plugins, /etc/mastiff
[Misc]
# verbose = [on|off]
verbose = off
[Sqlite]
# Sqlite database options
# db_file = Name of the database file
db_file = mastiff.db
[File ID]
# trid is the location of the TrID binary
# trid_db is the location of the TrID database
#trid = /usr/local/bin/trid
trid = /opt/trid/trid
#trid_db = /usr/local/etc/triddefs.trd
trid_db = /opt/trid/triddefs.trd
[Embedded Strings Plugin]
# Options for the Embedded Strings Plugin.
# strcmd is the path to the strings command
strcmd = /usr/bin/strings
[VirusTotal]
# Options for the VirusTotal Submission Plug-in.
# api_key is your API key from virustotal.com
#   - Leave this empty if you wish to disable this plug-in
api_key = GET_YOUR_OWN
# submit [on|off] - submit binary to VirusTotal
submit = off
[pdfid]
# Options to run Didier Stevens pdfid.py script
# pdfid_cmd = Path to the pdfid.py script
#   - Leave blank if you want the script disabled.
# pdfid_opts = Options for program.
#   - Do not put multiple options in quotes.
# Note: pdfid.py has bugs that may cause errors when examining
#       malformed PDFs when using the -e option.
pdfid_cmd = /opt/pdftools/pdfid.py
#pdfid_opts = -e
pdfid_opts =
[pdf-parser]
# Options to run Didier Stevens pdf-parser.py script
# pdf_cmd = Path to pdf-parser.py.
pdf_cmd = /opt/pdftools/pdf-parser.py
[PDF Metadata]
# Options for PDF Metadata script
# exiftool = path to exitfool
exiftool = /opt/exiftool/exiftool
[yara]
# Options for the Yara signature plug-in
# yara_sigs = Base path to Yara signatures. This path will be recursed
#             to find additional signatures.
#             Leave blank to disable the plug-in.
yara_sigs = /opt/yara
[Digital Signatures]
# Options to extract the digital signatures
#
# disitool - path to disitool.py script.
# openssl - path to openssl binary
disitool = /opt/disitool/disitool.py
openssl = /usr/bin/openssl
[Office Metadata]
# Options for Office Metadata script
# exiftool = path to exitfool
exiftool = /opt/exiftool/exiftool
[Single-Byte Strings]
# options for single-byte string extraction plug-in
# length - Minimum length to extract
length = 3
# raw - print raw characters instead of formatted ones (e.g. \\n vs. \n)
raw = False
[ZipExtract]
# options for Zip archive file extraction plug-in
# enabled: [on|off] - Extract files or not
# password: Password to use for zip file. OK to leave blank.
enabled = on
password = infected
[Office pyOLEScanner]
# olecmd = Path to pyOLEScanner.py
olecmd=/opt/pyOLEScanner/pyOLEScanner.py
EOF
Now testing MASTIFF out is as simple as:
cd /opt/mastiff
zwned@malwr:/opt/mastiff$ python mas.py /opt/mastiff/tests/test.exe
[2013-03-10 15:11:47,324] [INFO] [Mastiff] : Starting analysis on /opt/mastiff/tests/test.exe
[2013-03-10 15:11:47,326] [INFO] [Mastiff.Init_File] : Analyzing /opt/mastiff/tests/test.exe.
[2013-03-10 15:11:47,326] [INFO] [Mastiff.Init_File] : Log Directory: ./work/log/c69ffb3057b2077fcaecc99b9f16c7c8
[2013-03-10 15:11:47,417] [INFO] [Mastiff.DB.Insert] : Adding ['Generic', 'EXE']
[2013-03-10 15:11:47,506] [INFO] [Mastiff.Analysis] : File categories are ['Generic', 'EXE'].
[2013-03-10 15:11:47,507] [INFO] [Mastiff.Plugins.Embedded Strings Plugin] : Starting execution.
[2013-03-10 15:11:47,521] [INFO] [Mastiff.Plugins.File Information] : Starting execution.
[2013-03-10 15:11:47,602] [INFO] [Mastiff.Plugins.Fuzzy Hashing] : Starting execution.
[2013-03-10 15:11:47,602] [INFO] [Mastiff.Plugins.Fuzzy Hashing] : Generating fuzzy hash.
[2013-03-10 15:11:47,681] [INFO] [Mastiff.Plugins.Fuzzy Hashing.compare] : Comparing fuzzy hashes.
[2013-03-10 15:11:47,681] [INFO] [Mastiff.Plugins.VirusTotal] : Starting execution.
[2013-03-10 15:11:48,717] [INFO] [Mastiff.Plugins.VirusTotal.submit] : Submission disabled. Not sending file.
[2013-03-10 15:11:48,717] [INFO] [Mastiff.Plugins.yara] : Starting execution.
[2013-03-10 15:11:48,722] [INFO] [Mastiff.Plugins.Resources] : Starting execution.
[2013-03-10 15:11:48,774] [INFO] [Mastiff.Plugins.Single-Byte Strings] : Starting execution.
[2013-03-10 15:11:48,813] [INFO] [Mastiff.Plugins.PE Info] : Starting execution.
[2013-03-10 15:11:48,926] [INFO] [Mastiff.Plugins.Digital Signatures] : Starting execution.
[2013-03-10 15:11:48,975] [INFO] [Mastiff.Plugins.Digital Signatures] : No signature on the file.
[2013-03-10 15:11:48,976] [INFO] [Mastiff.Analysis] : Finished analysis for /opt/mastiff/tests/test.exe.
zwned@malwr:/opt/mastiff$ python mas.py /opt/mastiff/tests/test.pdf
[2013-03-10 15:12:36,299] [INFO] [Mastiff] : Starting analysis on /opt/mastiff/tests/test.pdf
[2013-03-10 15:12:36,299] [INFO] [Mastiff.Init_File] : Analyzing /opt/mastiff/tests/test.pdf.
[2013-03-10 15:12:36,300] [INFO] [Mastiff.Init_File] : Log Directory: ./work/log/3f53a4bf0097f9075ff641b03bb176f5
[2013-03-10 15:12:36,381] [INFO] [Mastiff.DB.Insert] : Adding ['PDF', 'Generic']
[2013-03-10 15:12:36,468] [INFO] [Mastiff.Analysis] : File categories are ['PDF', 'Generic'].
[2013-03-10 15:12:36,469] [INFO] [Mastiff.Plugins.pdf-parser] : Starting execution.
[2013-03-10 15:12:36,470] [INFO] [Mastiff.Plugins.pdf-parser.uncompress] : Uncompressing PDF.
[2013-03-10 15:12:36,563] [INFO] [Mastiff.Plugins.pdf-parser.get_objects] : Extracting interesting objects.
[2013-03-10 15:12:37,532] [INFO] [Mastiff.Plugins.PDF Metadata] : Starting execution.
[2013-03-10 15:12:37,643] [INFO] [Mastiff.Plugins.pdfid] : Starting execution.
[2013-03-10 15:12:37,729] [INFO] [Mastiff.Plugins.Embedded Strings Plugin] : Starting execution.
[2013-03-10 15:12:37,741] [INFO] [Mastiff.Plugins.File Information] : Starting execution.
[2013-03-10 15:12:37,819] [INFO] [Mastiff.Plugins.Fuzzy Hashing] : Starting execution.
[2013-03-10 15:12:37,820] [INFO] [Mastiff.Plugins.Fuzzy Hashing] : Generating fuzzy hash.
[2013-03-10 15:12:37,909] [INFO] [Mastiff.Plugins.Fuzzy Hashing.compare] : Comparing fuzzy hashes.
[2013-03-10 15:12:37,910] [INFO] [Mastiff.Plugins.VirusTotal] : Starting execution.
[2013-03-10 15:12:38,386] [INFO] [Mastiff.Plugins.VirusTotal.submit] : Submission disabled. Not sending file.
[2013-03-10 15:12:38,386] [INFO] [Mastiff.Plugins.yara] : Starting execution.
[2013-03-10 15:12:38,392] [INFO] [Mastiff.Analysis] : Finished analysis for /opt/mastiff/tests/test.pdf.
zwned@malwr:/opt/mastiff$ python mas.py /opt/mastiff/tests/test.doc
[2013-03-10 15:12:53,882] [INFO] [Mastiff] : Starting analysis on /opt/mastiff/tests/test.doc
[2013-03-10 15:12:53,883] [INFO] [Mastiff.Init_File] : Analyzing /opt/mastiff/tests/test.doc.
[2013-03-10 15:12:53,883] [INFO] [Mastiff.Init_File] : Log Directory: ./work/log/759f7e53f54df03f2ae06fcec25e8ac3
[2013-03-10 15:12:53,973] [INFO] [Mastiff.DB.Insert] : Adding ['Generic', 'Office', 'ZIP']
[2013-03-10 15:12:54,076] [INFO] [Mastiff.Analysis] : File categories are ['Generic', 'Office', 'ZIP'].
[2013-03-10 15:12:54,078] [INFO] [Mastiff.Plugins.Embedded Strings Plugin] : Starting execution.
[2013-03-10 15:12:54,088] [INFO] [Mastiff.Plugins.File Information] : Starting execution.
[2013-03-10 15:12:54,167] [INFO] [Mastiff.Plugins.Fuzzy Hashing] : Starting execution.
[2013-03-10 15:12:54,167] [INFO] [Mastiff.Plugins.Fuzzy Hashing] : Generating fuzzy hash.
[2013-03-10 15:12:54,234] [INFO] [Mastiff.Plugins.Fuzzy Hashing.compare] : Comparing fuzzy hashes.
[2013-03-10 15:12:54,234] [INFO] [Mastiff.Plugins.VirusTotal] : Starting execution.
[2013-03-10 15:12:55,239] [INFO] [Mastiff.Plugins.yara] : Starting execution.
[2013-03-10 15:12:55,244] [INFO] [Mastiff.Plugins.Office pyOLEScanner] : Starting execution.
[2013-03-10 15:12:57,497] [INFO] [Mastiff.Plugins.Office Metadata] : Starting execution.
[2013-03-10 15:12:57,681] [INFO] [Mastiff.Plugins.ZipInfo] : Starting execution.
[2013-03-10 15:12:57,682] [INFO] [Mastiff.Plugins.ZipExtract] : Starting execution.
[2013-03-10 15:12:57,683] [INFO] [Mastiff.Plugins.ZipExtract] : Password "infected" will be used for this zip.
[2013-03-10 15:12:57,683] [INFO] [Mastiff.Plugins.ZipExtract] : Extracting [Content_Types].xml.
[2013-03-10 15:12:57,683] [INFO] [Mastiff.Plugins.ZipExtract] : Extracting _rels/.rels.
[2013-03-10 15:12:57,684] [INFO] [Mastiff.Plugins.ZipExtract] : Extracting theme/theme/themeManager.xml.
[2013-03-10 15:12:57,684] [INFO] [Mastiff.Plugins.ZipExtract] : Extracting theme/theme/theme1.xml.
[2013-03-10 15:12:57,685] [INFO] [Mastiff.Plugins.ZipExtract] : Extracting theme/theme/_rels/themeManager.xml.rels.
[2013-03-10 15:12:57,685] [INFO] [Mastiff.Analysis] : Finished analysis for /opt/mastiff/tests/test.doc.
zwned@malwr:/opt/mastiff$ python mas.py /opt/mastiff/tests/test.
test.doc  test.exe  test.pdf  test.zip
zwned@malwr:/opt/mastiff$ python mas.py /opt/mastiff/tests/test.zip
[2013-03-10 15:13:22,856] [INFO] [Mastiff] : Starting analysis on /opt/mastiff/tests/test.zip
[2013-03-10 15:13:22,870] [INFO] [Mastiff.Init_File] : Analyzing /opt/mastiff/tests/test.zip.
[2013-03-10 15:13:22,871] [INFO] [Mastiff.Init_File] : Log Directory: ./work/log/033d488bbe65e8aececb2c55bdfbc2fd
[2013-03-10 15:13:23,035] [INFO] [Mastiff.DB.Insert] : Adding ['Generic', 'ZIP']
[2013-03-10 15:13:23,106] [INFO] [Mastiff.Analysis] : File categories are ['Generic', 'ZIP'].
[2013-03-10 15:13:23,107] [INFO] [Mastiff.Plugins.Embedded Strings Plugin] : Starting execution.
[2013-03-10 15:13:23,115] [INFO] [Mastiff.Plugins.File Information] : Starting execution.
[2013-03-10 15:13:23,178] [INFO] [Mastiff.Plugins.Fuzzy Hashing] : Starting execution.
[2013-03-10 15:13:23,178] [INFO] [Mastiff.Plugins.Fuzzy Hashing] : Generating fuzzy hash.
[2013-03-10 15:13:23,238] [INFO] [Mastiff.Plugins.Fuzzy Hashing.compare] : Comparing fuzzy hashes.
[2013-03-10 15:13:23,238] [INFO] [Mastiff.Plugins.VirusTotal] : Starting execution.
[2013-03-10 15:13:23,440] [INFO] [Mastiff.Plugins.VirusTotal.submit] : Submission disabled. Not sending file.
[2013-03-10 15:13:23,440] [INFO] [Mastiff.Plugins.yara] : Starting execution.
[2013-03-10 15:13:23,445] [INFO] [Mastiff.Plugins.ZipInfo] : Starting execution.
[2013-03-10 15:13:23,446] [INFO] [Mastiff.Plugins.ZipExtract] : Starting execution.
[2013-03-10 15:13:23,447] [INFO] [Mastiff.Plugins.ZipExtract] : Password "infected" will be used for this zip.
[2013-03-10 15:13:23,447] [INFO] [Mastiff.Plugins.ZipExtract] : Extracting test.bin.
[2013-03-10 15:13:23,447] [INFO] [Mastiff.Plugins.ZipExtract] : Extracting test.txt.
[2013-03-10 15:13:23,448] [INFO] [Mastiff.Analysis] : Finished analysis for /opt/mastiff/tests/test.zip.
If you did not receive any errors / warnings you should be good to go. Now that MASTIFF is up and running we can download MASTIFF2HTML on Github.
wget https://raw.github.com/1aN0rmus/TekDefense/master/MASTIFF2HTML.py
chmod +x MASTIFF2HTML.py
python MASTIFF2HTML.py -f /opt/mastiff/work/log/ -d mastiff.db
cd /opt/mastiff/work/log/www/
python -m SimpleHTTPServer
Now if you browse to 127.0.0.1:8000/mastiff.html you should be seeing the results for your analysis.
 If you run into any issues... please leave a comment so we can address / update as necessary.
Cheers
Sunday
Feb172013

Tektip ep22 - Helge's Switchblade Portable Malware Analysis

In this episode of Tektip, we take a look at Helge's Switchblade. I apologize for the somewhat poor quality of the recording, I was attempting to make the video very fast so I didn't miss any of the Shmoocon talks. Anyways, Switchblade is a windows application that is a toolkit for troubleshooting, analyzing, and mitigating Windows issues. Think of it as a toolkit that contains many freeware and open source tools.

We were lucky enough to get a pre-release copy of version .8 to show off for this video. While I too often need to do generic windows troubleshooting for friends and family, I always like to put a Malware Analysis spin on things when I can. So in this video I focus on how to utilize some of the tools in switchblade to do some basic malware analysis. For me, this is a great portable malware analysis toolkit.

If you want to follow along, feel free to download the malware samples I used in the downloads section.

Enjoy!