Sponsor

Security Videos

Entries in Automater (12)

Friday
Nov202015

Automater Update .21

Keeping Automater up to date:

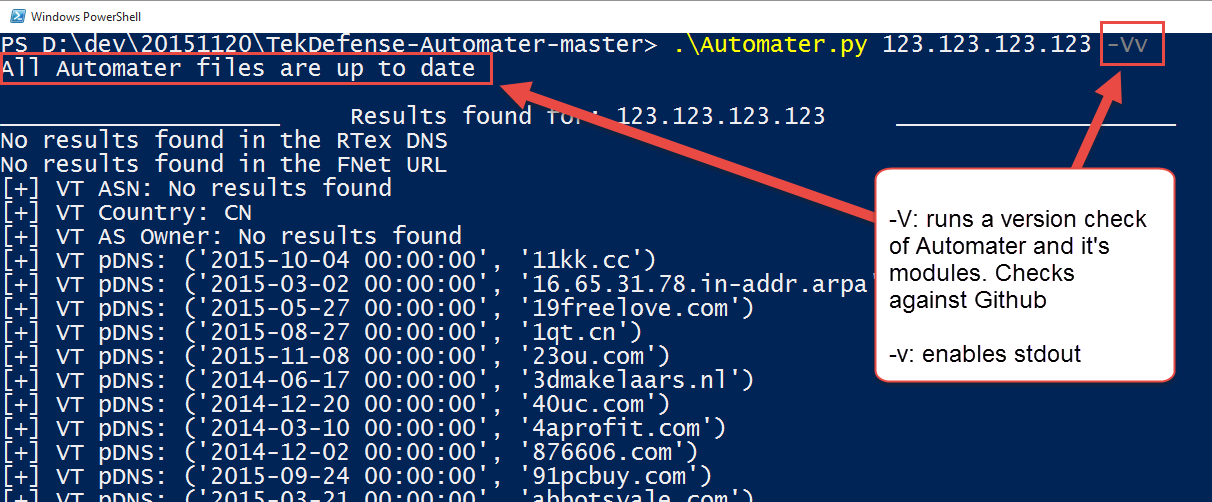
One of the more outstanding modifications added to version .21 of Automater is that users no longer need to worry about keeping on top of the GitHub site to ensure all of the python modules are the latest version. With a small addition of a –Vv in the command line arguments, Automater will check if the local python modules match the modules on the TekDefense Automater GitHub site. The –V (--vercheck) argument is actually the argument that tells Automater to check the modules, and the small –v (--verbose) is required to make Automater report the outcome. If the files don’t match, Automater will send a notification to stdout to alert the user to which module has been modified, so up to date modules can be pulled if the user wants. The –v (--verbose) option can be used to turn on or off any information sent to stdout to either silence or allow Automater to talk to stdout.
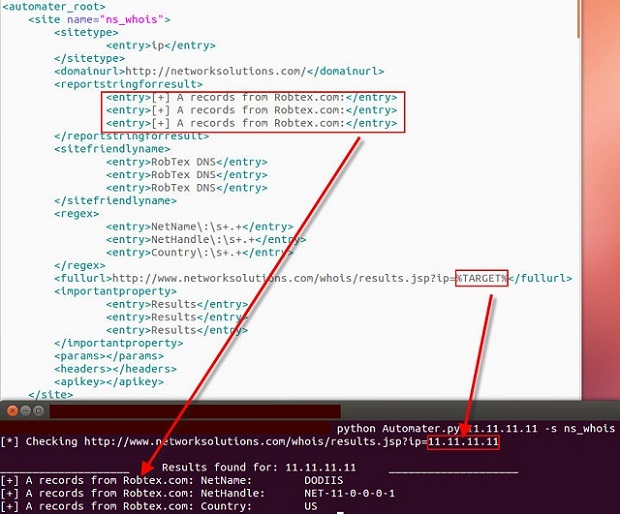
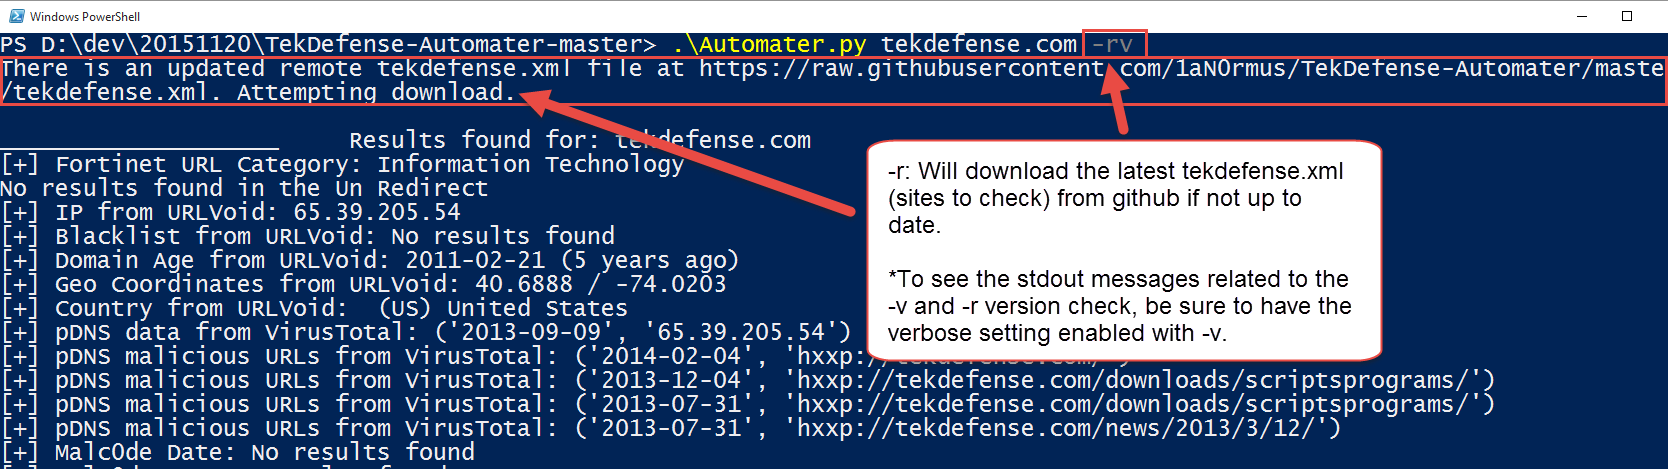
Arguably an even better option added is yet another “version” check of sorts. The sites.xml file is still required locally so that Automater can get instructions on what sites to check and what regexs to report upon. However, a new tekdefense.xml file is also checked for and utilized if it is found locally. The significance of this is that with a –r (--refreshxml) switch included in the command line argument call, Automater will check the TekDefense Automater GitHub site and pull the tekdefense.xml file for use. If the –r switch is utilized, and the local tekdefense.xml file is found to be different on the local machine, the modified (updated) file on GitHub will be pulled and utilized. This ensures that you have the ability to do your own calls with the sites.xml file, while ALSO maintaining constant calls to sites and checks utilized by the TekDefense crew. Together this gives the Automater use the best coverage with no modifications required or manual processes followed.

New Requirements and what they mean:

The new Automater has several updates. Out of the blocks, the requests module (version 2.7 or above) is now required to run Automater. For instructions on getting the requests module if you don't already have view http://docs.python-requests.org/en/latest/user/install/. This gives us better control of returning HTML and sets us up for further upgrades in the near future when we begin using JSON APIs and data collecting capabilities – more on this as things progress. Using requests, the default timeout of get calls to web sites has now been set to 5 seconds. This allows Automater to move on after 5 seconds of waiting for a response from a web site. However, if a web site does respond and provide some input, but the site is slow in its response time, the get request will not timeout. This timeout is only for those sites that just don’t respond. Further refinements on this subject will continue in future upgrades. There are several bug fixes and other modifications and we will soon thread Automater to provide better response times. For instance the delay feature was fixed.
.\Automater.py -h
usage: Automater.py [-h] [-o OUTPUT] [-b] [-f CEF] [-w WEB] [-c CSV]
                    [-d DELAY] [-s SOURCE] [--proxy PROXY] [-a USERAGENT] [-V]
                    [-r] [-v]
                    target
IP, URL, and Hash Passive Analysis tool
positional arguments:
  target                List one IP Address (CIDR or dash notation accepted),
                        URL or Hash to query or pass the filename of a file
                        containing IP Address info, URL or Hash to query each
                        separated by a newline.
optional arguments:
  -h, --help            show this help message and exit
  -o OUTPUT, --output OUTPUT
                        This option will output the results to a file.
  -b, --bot             This option will output minimized results for a bot.
  -f CEF, --cef CEF     This option will output the results to a CEF formatted
                        file.
  -w WEB, --web WEB     This option will output the results to an HTML file.
  -c CSV, --csv CSV     This option will output the results to a CSV file.
  -d DELAY, --delay DELAY
                        This will change the delay to the inputted seconds.
                        Default is 2.
  -s SOURCE, --source SOURCE
                        This option will only run the target against a
                        specific source engine to pull associated domains.
                        Options are defined in the name attribute of the site
                        element in the XML configuration file. This can be a
                        list of names separated by a semicolon.
  --proxy PROXY         This option will set a proxy to use (eg.
                        proxy.example.com:8080)
  -a USERAGENT, --useragent USERAGENT
                        This option allows the user to set the user-agent seen
                        by web servers being utilized. By default, the user-
                        agent is set to Automater/version
  -V, --vercheck        This option checks and reports versioning for
                        Automater. Checks each python module in the Automater
                        scope. Default, (no -V) is False
  -r, --refreshxml      This option refreshes the tekdefense.xml file from the
                        remote GitHub site. Default (no -r) is False.
  -v, --verbose         This option prints messages to the screen. Default (no
                        -v) is False.
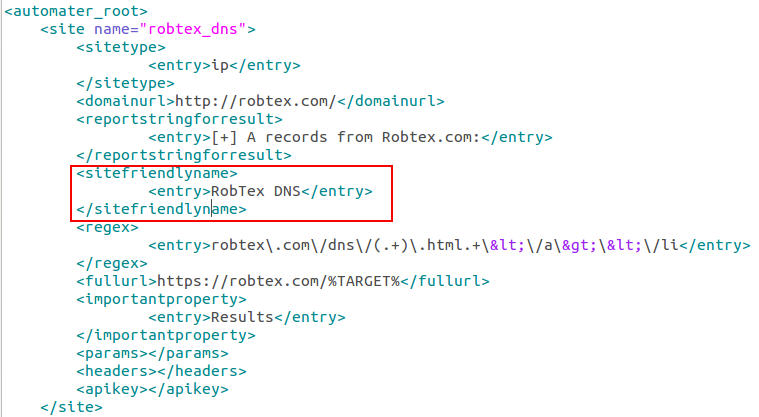
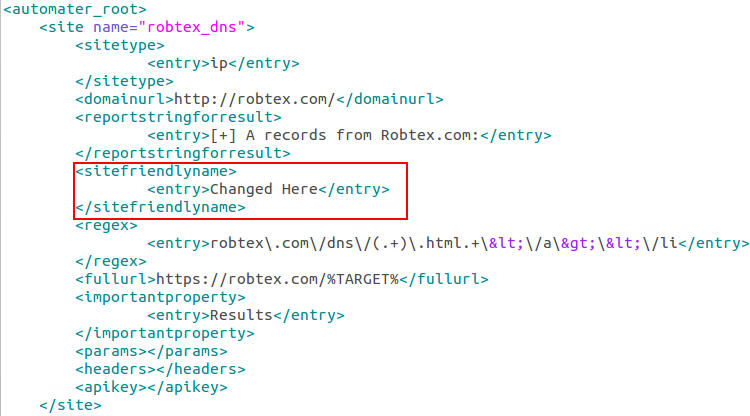
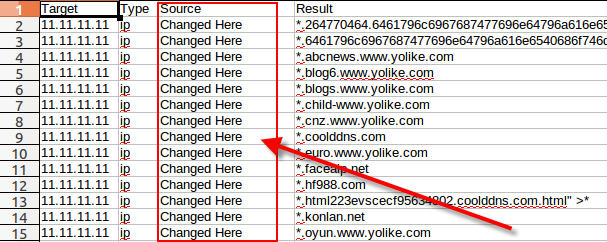
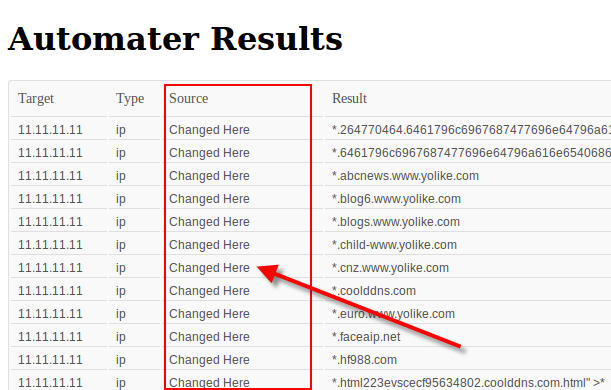
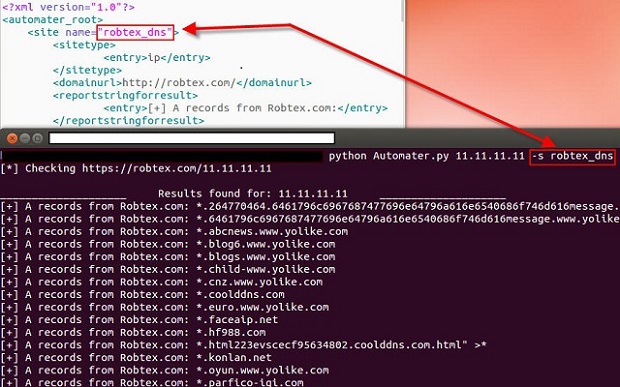
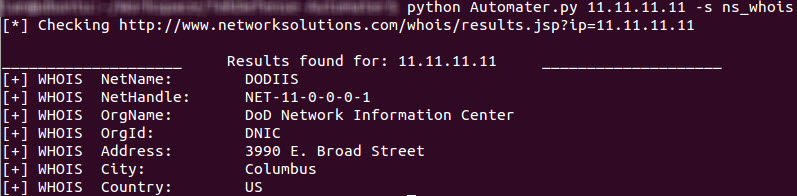
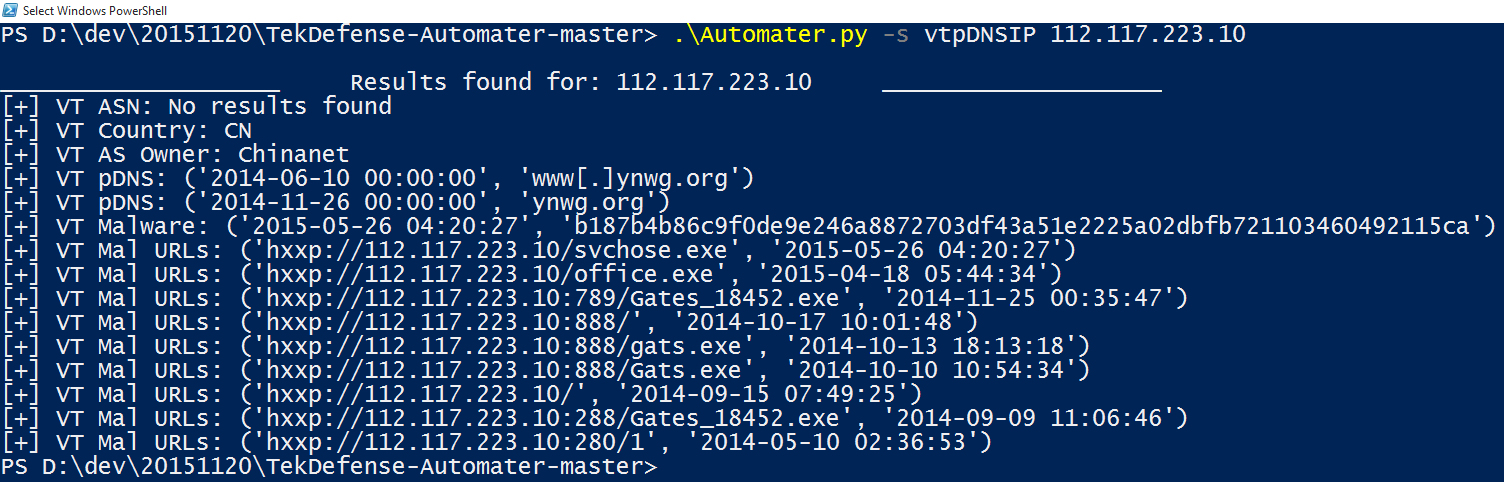
Specific sites (already in the sites.xml or tekdefense.xml file) can be called in case the user only wants responses from specific sites. While previous versions of Automater allowed this function for one site using the –s (--source) switch, the new version allows multiple sites to be utilized by separating the required sites with a semicolon. So in the past, if the user had a sites.xml file with the totalhash_ip entry, the user could call Automater with –s totalhash_ip and only receive information about totalhash. However, if the user now wants more than totalhash output, but not all information in the sites.xml or tekdefense.xml file(s), he could enter something like Automater –s totalhash_ip;robtex to get totalhash and robtex information. Any site within the sites.xml or tekdefense.xml ca be joined in this way using the semicolon separator between sites.


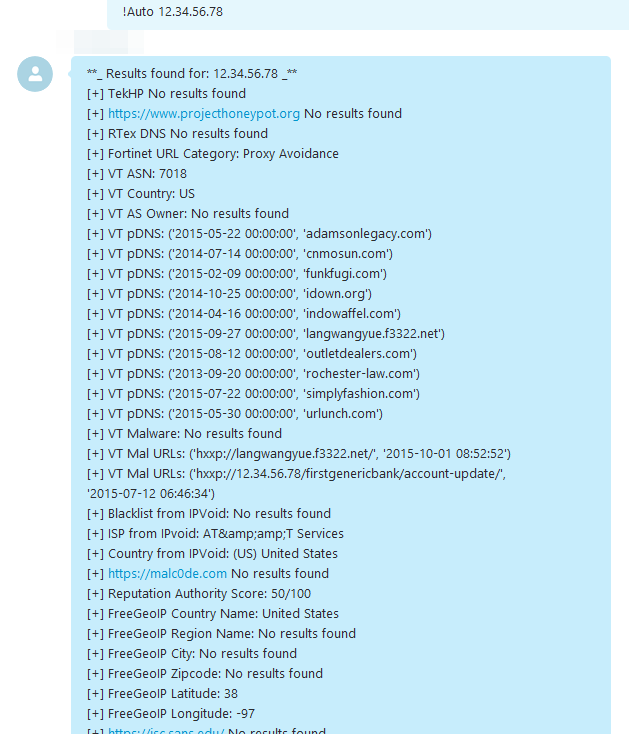
Lastly, there is now a bot output mode for those who want friendlier output for bots. For instance here is the output using Automater with -b in a skype bot.


Wednesday
Jun182014

Automater version 2.1 released - Proxy capabilities and a little user-agent modification

It has been a little while since some of our posts on Automater and its capabilities. However, we haven't stopped moving forward on the concept and are proud to announce that Automater has been included in the latest release of REMnux  and also made the cut for ToolsWatch. Of course, you should get your copy from our GitHub repo since we'll be updating GitHub just prior to getting the updates to other repositories. Okay, enough back-patting and proverbial "glad handing", we are excited to let everyone know that Automater has a new user-agent output that is configurable by the user and now fully supports proxy-based requests and submissions! Thanks go out to nullprobe for taking interest in the code and pushing us forward on getting the proxy capability completed. Although we didn't use the exact submission he provided, we definitely used some code and ideas he provided. Thanks again nullprobe!

The New Stuff

Okay, for a quick review of some of the old posts if you're new to Automater, or need to refresh yourself with the product, please go here, here, and here to read about Automater its capabilities and extensibility as well as output format etc... As you probably know, Automater is an extensible OSINT tool that has quite a few capabilities. To get straight to the point, Automater can now be run with new command-line tags to enable proxy functionality and to change the user-agent submitted in the header of the web requests made from the tool.

User-Agent Changes

Prior to this upgrade, the Automater sent a default user-agent string based on the browser settings on the device hosting the application. While this is probably fine, it just......well.....wasn't good enough for us. By default, the Automater now sends the user-agent string of 'Automater/2.1' with requests and posts (if post submissions are required). However, you now have the ability to change that user-agent string to one of your liking by using the command-line parameter or -a or --agent followed by the string you'd like to use. A new Automater execution line using this new option would look something like:

python Automater.py 1.1.1.1 -a MyUserAgent/1.0

or some such thing that you'd like to send as a user-agent string in the header.

Proxy Capabilities

A significant modification in this version was the inclusion of a capability to utilize a network proxy system. To enable this functionality, all that is needed is the command line argument --proxy followed by the address and the port the proxy device is listening on during Automater execution. For instance, if my network proxy is at IP address 10.1.1.1 and is listening on port 8080 I would execute the Automater by typing:

python Automater.py 1.1.1.1 --proxy 10.1.1.1:8080

of course, your system will utilize standard DNS resolution practices if you only know the name of your network proxy and resolve the IP address automatically. So, if the proxy is known as proxy.company.com listening on port 8080, you would type:

python Automater.py 1.1.1.1 --proxy proxy.company.com:8080

it's as simple as that!

Further Movement

We are still working on other submissions and requests, so please keep them coming as we will continue to upgrade as we get requests as well as when we find more efficient ways to do things. We appreciate the support and would love to answer any questions you may have, so give us a yell if you need anything.

p4r4n0y1ng and 1aN0rmus.....OUT!

Wednesday
Dec112013

Automater Output Format and Modifications

Our recent post on the extensibility of Automater called for a few more posts discussing other options that the program has available. Particularly, we want to show off some different output options that Automater provides and discuss the sites.xml modifications that provide different output formatting. Please read the extensibility article to get caught up with sites.xml modifications if you are not aware of the options provided with that configuration file.

Automater offers a few possibilities for printouts outside of the standard output (screen-based output) that most users are aware of. By running:

python Automater.py 1.1.1.1 –o output.txt

We tell Automater to run against target 1.1.1.1 and to create a text file named output.txt within the current directory. You can see here, that after Automater does its work and lays out the standard report information to the screen, it also tells you that it has created the text file that you have requested.

Once opened, it is quite obvious that this is the standard output format that you see on your screen now saved to a text file format for storage and further use later.

While this text format is useful, we thought it would be better to provide the capability to provide a csv format as well as something that would render in a browser. To retrieve a csv formatted report, you would use the –c command line switch and to retrieve an html formatted report, you would use the –w command line switch. These options can all be run together, so if we ran the command:

python Automater.py 1.1.1.1 –o output.txt –c output.csv –w output.html

We would receive 3 different reports other than the standard screen reporting – 1 standard text file, 1 comma-seperated text file, and 1 html formatted file. Each of the reports are different and can be utilized based on your requirements.

Since we’ve already seen the text file, I wanted to show you the layout of the HTML and comma-separated outputs. Below you can see them, and I think you’ll find each of these quite useful for your research endevours.

You will notice that I’ve called out a specific “column” in each of the files that is marked with the header “Source” in each. This is where the modification of the sites.xml file comes into play. Again, if you need to take a look at how to use sites.xml file for adding other sites and modifying output functionality, please see this article. But for now, let’s take a look at what we can do with changing the html and comma-separated report format functionality by changing one simple entry in the sites.xml file. Below, you can see a good look at the robtex.com site element information within the config file. It is obviously here that we want to modify this scenario, since both of our outputs have RobTex DNS written out in the Source “column.” Looking at the sites.xml file we can easily see that this entry must be defined within the <sitefriendlyname> XML element.

Let’s change our sites.xml file to show how modifying the <sitefriendlyname> XML element can change our report ouput. We will change the <entry> element within the <sitefriendlyname> element to say “Changed Here” as seen below:

Now we will run Automater again with the same command line as before:

python Automater.py 1.1.1.1 –o output.txt –c output.csv –w output.html

And we’ll take a look again at our output.csv and output.html files. Notice that the Source “column” information has been changed to represent what you want to see based on the sites.xml configuration file.

As you’ll see when you inspect the sites.xml format, you can change these <entry> elements within the <sitefriendlyname> elements for each regular expression that you are looking for on those sites that have multiple entries. This allows you to change the Source output string in the file based on specific findings. For instance, if you look at the default sites.xml file that we provide you at GitHub you will find that our VirusTotal sites have multiple entries for the Source string to be reported. This allows you full autonomy in reporting information PER FINDING (regex) so that your results are easily read and understood by you and your team.

Tuesday
Dec102013

The Extensibility of Automater

With the recent release of version 2.0 of Automater, we hoped to significantly save some of your time by being able to use the tool as a sort of one-stop-shop for that first stage of analysis. The code as provided on GitHub will certainly accomplish that, since we have provided the ability for the tool to utilize sites such as virustotal, robtex, alienvault, ipvoid, threatexpert and a slew of others.  However, our goal was to make this tool more of a framework for you to modify based on you or your team’s needs. 1aN0rmus posted a video (audio is really ow ... sorry) on that capability, but we wanted to provide an article on the functionality to help you get the tool working based on your requirements.

One of the steps in the version upgrade was to ensure the Python code was easily modified if necessary, but truthfully our hope was to create the tool so that no modification to the code would be required. To accomplish this, we provided an XML configuration file called sites.xml with the release. We utilized XML because we thought it was a relatively universal file format that was easily understood, that could also be utilized for future web-based application of the tool. When creating the file, we made the layout purposefully simple and flat so that no major knowledge of XML was required. The following will discuss sites.xml manipulation where we will assume a new requirement for whois information.

Our scenario will be wrapped around the networksolutions.com site where we will gather a few things from their whois discovery tool. Our first step is to look in detail at the site and discover what we want to find from it when we run Automater. In this case, we determine that we want to retrieve the NetName, NetHandle, and Country that the tool lists based on the target we are researching. Notice also that we need to get the full URL that is required for our discovery, to include any querystrings etc…

Now that we know what we want to find each time we run Automater, all we have to do is create some regular expressions to find the information when the tool retrieves the site. I left the regexs purposely loose for readability here. See our various tutorials on Regex if you would like to learn more. In this case, we will use:


• NetName\:\s+.+
• NetHandle\:\s+.+
• Country\:\s+.+


which will grab the NetName, NetHandle, and Country labels as well as the information reported on the site. The more restrictive your regex is, the better your results will be. This is just an example, but once you have the regex you need to get the information you desire, you are ready to modify the sites.xml file and start pulling the new data.

Our first step will be to add a new XML <site> element by simply copying and pasting an entire <site> within the current sites.xml file. Since we need to add a new site to discover, we can easily just copy and paste an already established entry to utilize as a skeleton to work with. Just copy and paste from a <site> element entry to a closing </site> element. Since you’re adding the site, you can place it anywhere in the file, but in our case we will put it at the top of the file.

Once this is done, we need to modify the new entry with the changes that we currently know. Let’s come up with a common name that we can use. The <site> element’s “name” parameter is what the tool utilizes to find a specific site. This is what the tool uses when we send in the –s argument to the Automater program. For instance, let’s run python Automater.py 11.11.11.11 –s robtex_dns. Here you can see that Automater used the ip address 11.11.11.11 as the target, but it only did discovery on the robtex.com website. This was accomplished by using the –s parameter with the friendly name parameter.


We will use ns_whois for our friendly name and will continue to make modifications to our sites.xml file. We know that this site uses IP addresses as targets, so it will be an ip sitetype. A legal entry for the <sitetype> XML element is one of ip, md5, or hostname. If a site can be used for more than one of these, you can list extras in each <entry> XML element. (You can see an example of this in use in the standard sites.xml file in the Fortinet categorization site entry.) We also know that the parent domain URL is http://networksolutions.com. The <domainurl> XML element is not functionally used, but will be in later versions, so just list the parent domain URL.  With this information, we can modify quite a bit of our file as shown.


Now let’s move down the file to the regex entries since we know this information, as well as the Full URL information. In the <regex> XML element, we list one regex per <entry> XML element. In this case, we want to find three separate pieces of information with our already defined regex definitions so we will have three <entry> elements within our <regex> element. We also know our Full URL information based on the networksolutions site we visited and this information is placed in the <fullurl> XML element. However, we can’t list the ip address as we found in the Full URL information because that would not allow the tool to change the target based on your requirements. Therefore whenever a target IP address, MD5 hash or hostname is needed in a querystring, or within any post data, you must use the keyword %TARGET%. Automater will replace this text with the target required – in this case 11.11.11.11. Now we have the Full URL and regex entries of:


• http://www.networksolutions.com/whois/results.jsp?ip=%TARGET%
• NetName\:\s+.+
• NetHandle\:\s+.+
• Country\:\s+.+


A requirement of Automater is that the <reportstringforresult>, <sitefriendlyname> and <importantproperty> XML elements have the same number of <entry> elements as our <regex> XML elements – which in this case is three. This “same number of <entry> elements” requirement is true for all sites other than a site requiring a certain post. I will post another document discussing that later. For now, we will just copy the current reportstringforresult, sitefriendlyname, and importantproperty entries a couple of times and leave the current information there so you can see what happens. Then we’ll modify that based on your  assumed requirements.
Our new site entry in the sites.xml file currently looks like the following:


Here you can see the use of the %TARGET% keyword in the <fullurl> element as well as the new <regex> element regex entries. You can also see that I just copied the <sitefriendlyname> and <reportstringforresult> element information from the robtex entry that we copied and pasted. We did the same for the <importantproperty> XML element, but the entries here will be “Results” most of the time. I will post more on what this field allows later. Let’s take a look at running Automater with the current information in the sites.xml file and ensure we only use the networksolutions site by using the –s argument as before with the new ns_whois friendly name as the argument. Our call will be:


python Automater.py 11.11.11.11 –s ns_whois

Once we run this command we receive the following information:


Notice that the <reportstringforresult> element is shown with the report string. Also notice the %TARGET% keyword has been replaced with the target address. Now we need to change the <reportstringforresult> element so that we can get a better report string for each entry. In this case, we will change the report strings to [+] WHOIS for each entry just to show the change. We will also change the <sitefriendlyname> element to NetName, NetHandle, and Country so that they are correct. The <sitefriendlyname> element is used in the other reporting capabilities (web and csv). I will post something on that later as well. For now change your sites.xml <reportstringforresult> entries and then see what your report looks like! Should look something like the following screenshot, except that in my case I have also added a few more <entry>'s.

Hopefully this helps you understand how extensible the Automater application is now. Simple modifications to the sites.xml will give you the ability to collect massive information from multiple sites based on what you or your team needs with no Python changes required. Let us know.

Wednesday
Dec042013

Finally the new Automater release is out!

With the exception of my review of the Volatility Malware and Memory Forensics class yesterday, it has been a while since I have posted here. Time for me to get back into the swing of things. The best way to do so is with a new release to the tool that really launched code development projects on TekDefense.

Automater is a tool that I orginially created to automate the OSINT analysis of IP addresses. It quickly grew and became a tool to do analysis of IP Addresses, URLs, and Hashes. Unfortunately though, this was my first python project and I made a lot of mistakes, and as the project grew it bacame VERY hard for me to maintain. 

Luckily, a mentor and friend of mine (@jameshub3r) offered his time and expertise to do an enitre re-write of the code that would focus on a modular extensible framework. The new code hits the mark as far as that is concerned. The real power of Automater is how easy it is to modify what sources are checked and what data is taken from them without having to modify the python code. To modify sources simply open up the sites.xml file and modify away. I'll do another post later that goes into more detail there.

To view a bit more about installation and usage head over to the new Automater page.

You can download the code directly on Github. Remeber Automater is not a single file anymore, you need to download all of the files in the Automater repo to the same directory. To the first person that reports a valid bug to me, I'll send you a random game on Steam.

Here are a few screenshots to hold you over until you get it running.