Sponsor

Security Videos

Entries in DFIR (4)

Wednesday
Dec112013

Automater Output Format and Modifications

Our recent post on the extensibility of Automater called for a few more posts discussing other options that the program has available. Particularly, we want to show off some different output options that Automater provides and discuss the sites.xml modifications that provide different output formatting. Please read the extensibility article to get caught up with sites.xml modifications if you are not aware of the options provided with that configuration file.

Automater offers a few possibilities for printouts outside of the standard output (screen-based output) that most users are aware of. By running:

python Automater.py 1.1.1.1 –o output.txt

We tell Automater to run against target 1.1.1.1 and to create a text file named output.txt within the current directory. You can see here, that after Automater does its work and lays out the standard report information to the screen, it also tells you that it has created the text file that you have requested.

Once opened, it is quite obvious that this is the standard output format that you see on your screen now saved to a text file format for storage and further use later.

While this text format is useful, we thought it would be better to provide the capability to provide a csv format as well as something that would render in a browser. To retrieve a csv formatted report, you would use the –c command line switch and to retrieve an html formatted report, you would use the –w command line switch. These options can all be run together, so if we ran the command:

python Automater.py 1.1.1.1 –o output.txt –c output.csv –w output.html

We would receive 3 different reports other than the standard screen reporting – 1 standard text file, 1 comma-seperated text file, and 1 html formatted file. Each of the reports are different and can be utilized based on your requirements.

Since we’ve already seen the text file, I wanted to show you the layout of the HTML and comma-separated outputs. Below you can see them, and I think you’ll find each of these quite useful for your research endevours.

You will notice that I’ve called out a specific “column” in each of the files that is marked with the header “Source” in each. This is where the modification of the sites.xml file comes into play. Again, if you need to take a look at how to use sites.xml file for adding other sites and modifying output functionality, please see this article. But for now, let’s take a look at what we can do with changing the html and comma-separated report format functionality by changing one simple entry in the sites.xml file. Below, you can see a good look at the robtex.com site element information within the config file. It is obviously here that we want to modify this scenario, since both of our outputs have RobTex DNS written out in the Source “column.” Looking at the sites.xml file we can easily see that this entry must be defined within the <sitefriendlyname> XML element.

Let’s change our sites.xml file to show how modifying the <sitefriendlyname> XML element can change our report ouput. We will change the <entry> element within the <sitefriendlyname> element to say “Changed Here” as seen below:

Now we will run Automater again with the same command line as before:

python Automater.py 1.1.1.1 –o output.txt –c output.csv –w output.html

And we’ll take a look again at our output.csv and output.html files. Notice that the Source “column” information has been changed to represent what you want to see based on the sites.xml configuration file.

As you’ll see when you inspect the sites.xml format, you can change these <entry> elements within the <sitefriendlyname> elements for each regular expression that you are looking for on those sites that have multiple entries. This allows you to change the Source output string in the file based on specific findings. For instance, if you look at the default sites.xml file that we provide you at GitHub you will find that our VirusTotal sites have multiple entries for the Source string to be reported. This allows you full autonomy in reporting information PER FINDING (regex) so that your results are easily read and understood by you and your team.

Tuesday
Dec102013

The Extensibility of Automater

With the recent release of version 2.0 of Automater, we hoped to significantly save some of your time by being able to use the tool as a sort of one-stop-shop for that first stage of analysis. The code as provided on GitHub will certainly accomplish that, since we have provided the ability for the tool to utilize sites such as virustotal, robtex, alienvault, ipvoid, threatexpert and a slew of others.  However, our goal was to make this tool more of a framework for you to modify based on you or your team’s needs. 1aN0rmus posted a video (audio is really ow ... sorry) on that capability, but we wanted to provide an article on the functionality to help you get the tool working based on your requirements.

One of the steps in the version upgrade was to ensure the Python code was easily modified if necessary, but truthfully our hope was to create the tool so that no modification to the code would be required. To accomplish this, we provided an XML configuration file called sites.xml with the release. We utilized XML because we thought it was a relatively universal file format that was easily understood, that could also be utilized for future web-based application of the tool. When creating the file, we made the layout purposefully simple and flat so that no major knowledge of XML was required. The following will discuss sites.xml manipulation where we will assume a new requirement for whois information.

Our scenario will be wrapped around the networksolutions.com site where we will gather a few things from their whois discovery tool. Our first step is to look in detail at the site and discover what we want to find from it when we run Automater. In this case, we determine that we want to retrieve the NetName, NetHandle, and Country that the tool lists based on the target we are researching. Notice also that we need to get the full URL that is required for our discovery, to include any querystrings etc…

Now that we know what we want to find each time we run Automater, all we have to do is create some regular expressions to find the information when the tool retrieves the site. I left the regexs purposely loose for readability here. See our various tutorials on Regex if you would like to learn more. In this case, we will use:


• NetName\:\s+.+
• NetHandle\:\s+.+
• Country\:\s+.+


which will grab the NetName, NetHandle, and Country labels as well as the information reported on the site. The more restrictive your regex is, the better your results will be. This is just an example, but once you have the regex you need to get the information you desire, you are ready to modify the sites.xml file and start pulling the new data.

Our first step will be to add a new XML <site> element by simply copying and pasting an entire <site> within the current sites.xml file. Since we need to add a new site to discover, we can easily just copy and paste an already established entry to utilize as a skeleton to work with. Just copy and paste from a <site> element entry to a closing </site> element. Since you’re adding the site, you can place it anywhere in the file, but in our case we will put it at the top of the file.

Once this is done, we need to modify the new entry with the changes that we currently know. Let’s come up with a common name that we can use. The <site> element’s “name” parameter is what the tool utilizes to find a specific site. This is what the tool uses when we send in the –s argument to the Automater program. For instance, let’s run python Automater.py 11.11.11.11 –s robtex_dns. Here you can see that Automater used the ip address 11.11.11.11 as the target, but it only did discovery on the robtex.com website. This was accomplished by using the –s parameter with the friendly name parameter.


We will use ns_whois for our friendly name and will continue to make modifications to our sites.xml file. We know that this site uses IP addresses as targets, so it will be an ip sitetype. A legal entry for the <sitetype> XML element is one of ip, md5, or hostname. If a site can be used for more than one of these, you can list extras in each <entry> XML element. (You can see an example of this in use in the standard sites.xml file in the Fortinet categorization site entry.) We also know that the parent domain URL is http://networksolutions.com. The <domainurl> XML element is not functionally used, but will be in later versions, so just list the parent domain URL.  With this information, we can modify quite a bit of our file as shown.


Now let’s move down the file to the regex entries since we know this information, as well as the Full URL information. In the <regex> XML element, we list one regex per <entry> XML element. In this case, we want to find three separate pieces of information with our already defined regex definitions so we will have three <entry> elements within our <regex> element. We also know our Full URL information based on the networksolutions site we visited and this information is placed in the <fullurl> XML element. However, we can’t list the ip address as we found in the Full URL information because that would not allow the tool to change the target based on your requirements. Therefore whenever a target IP address, MD5 hash or hostname is needed in a querystring, or within any post data, you must use the keyword %TARGET%. Automater will replace this text with the target required – in this case 11.11.11.11. Now we have the Full URL and regex entries of:


• http://www.networksolutions.com/whois/results.jsp?ip=%TARGET%
• NetName\:\s+.+
• NetHandle\:\s+.+
• Country\:\s+.+


A requirement of Automater is that the <reportstringforresult>, <sitefriendlyname> and <importantproperty> XML elements have the same number of <entry> elements as our <regex> XML elements – which in this case is three. This “same number of <entry> elements” requirement is true for all sites other than a site requiring a certain post. I will post another document discussing that later. For now, we will just copy the current reportstringforresult, sitefriendlyname, and importantproperty entries a couple of times and leave the current information there so you can see what happens. Then we’ll modify that based on your  assumed requirements.
Our new site entry in the sites.xml file currently looks like the following:


Here you can see the use of the %TARGET% keyword in the <fullurl> element as well as the new <regex> element regex entries. You can also see that I just copied the <sitefriendlyname> and <reportstringforresult> element information from the robtex entry that we copied and pasted. We did the same for the <importantproperty> XML element, but the entries here will be “Results” most of the time. I will post more on what this field allows later. Let’s take a look at running Automater with the current information in the sites.xml file and ensure we only use the networksolutions site by using the –s argument as before with the new ns_whois friendly name as the argument. Our call will be:


python Automater.py 11.11.11.11 –s ns_whois

Once we run this command we receive the following information:


Notice that the <reportstringforresult> element is shown with the report string. Also notice the %TARGET% keyword has been replaced with the target address. Now we need to change the <reportstringforresult> element so that we can get a better report string for each entry. In this case, we will change the report strings to [+] WHOIS for each entry just to show the change. We will also change the <sitefriendlyname> element to NetName, NetHandle, and Country so that they are correct. The <sitefriendlyname> element is used in the other reporting capabilities (web and csv). I will post something on that later as well. For now change your sites.xml <reportstringforresult> entries and then see what your report looks like! Should look something like the following screenshot, except that in my case I have also added a few more <entry>'s.

Hopefully this helps you understand how extensible the Automater application is now. Simple modifications to the sites.xml will give you the ability to collect massive information from multiple sites based on what you or your team needs with no Python changes required. Let us know.

Tuesday
Dec032013

Review - Malware and Memory Forensics with Volatility

I was lucky enough to get a seat in the Volatility class a few weeks back. As I know many of you are interested in DFIR, especially as it pertains to memory analysis, I figured it would be worth writing a review of the class. 

Exceeding Expectations

Before signing up for the class, I had spoken to a few folks who had attended previously. They all gave the class a big thumbs up, but I initially still had reservations. My main fear was that the class would just reinforce what I already knew. I did not want the class to be a "run the plugin" type of class. What I hoped for was a class that would teach me how the plugins worked while also teaching enough about the framework that I could start writing my own plugins. The material covered in the class far exceeded what I had hoped for. I learned about the volatility framework and how each of the plugins worked, but also learned much more such as Windows internals, memory internals, and some reverse engineering. Later in the article I will speak to some of the other topics that are covered as well.
 

Prerequisites / Target Audiences

Before delving too much into the course content, I think it is important to talk about some of the prerequisites for the class and understand who this course is for. I wouldn’t normally focus on this topic, but for this class I think it is vital that people understand what they are getting into. The listed prerequisites are:
 
Some experience with the volatility framework
Basic knowledge of digital investigation tools and techniques
Comfortable with general troubleshooting in Windows and Linux
Familiar with popular systems administrations tools like the SysInternals Utilities
Comfortable with Windows and Linux command line
Basic scripting knowledge with Python or similar language
 
Now some of these are more important than others in my opinion. For instance I don’t think the scripting knowledge was really necessary in all but a couple labs. That said, going to the class I met all of the requirements, but still felt a bit overwhelmed particularly on the first day. The main reason being, that while I understand python very well, I did not have a firm grasp of C or assembly. Much of the first day is spent getting everyone up to speed on things like C structures, OS Internals, and the Intel Architecture. This material would have been much easier to digest if I had a better understanding of the basic concepts before attending the class. So I would pick up Windows Internals 6th Edition and The Malware Analysis Cookbook, to brush up on that type of material if you are not already familiar.
 
While I mentioned the first day was a bit rough for me because I lacked some of that depth, the instructors quickly brought me and the rest of the class up to speed. It felt a lot like I remember USMC bootcamp, first they break you down showing you how much you don’t know, and then spend the rest of the week building you up until you feel like a rockstar.
 
As for the target audiences for this class, I think there are many various functional groups that could benefit. The obvious groups are of course your Incident Responders and Incident Analysts. Additionally though, I think that Reverse Engineers are probably the best suited for the class and gain the most from it. There are folks I would recommend not take the course. It was painful to hear some of the comments coming from some of the attendees that were having a hard time keeping up. If you do not understand basic command line usage, or how to setup a vm, or mount a drive in Linux, I would recommend spending some time on those topics first. Luckily, the Volatility team created a training preparation guide that dives into these topics and leads you towards deeper material as well. The preparation guide also includes a cheat sheet of Linux and Windows commands to assist those who may not be familiar with them. This guide is given 45 days before the course to give you adequate time to prepare.
 

Topics Covered

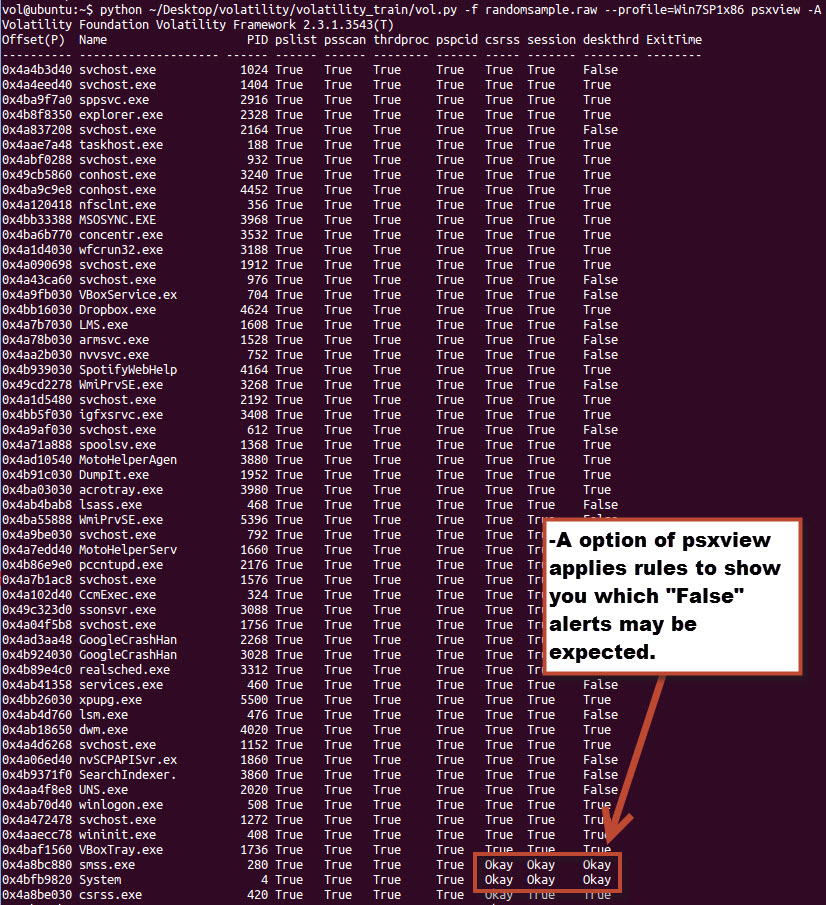
As I mentioned earlier in the review, I learned much more than I had anticipated in the course. Walking into the class I understood how to run plugins in volatility and interpret the results. Leaving the class I feel I have a much deeper understanding of the volatility framework and plugins, but more importantly Windows internals and Memory internals. For instance before class I knew it was bad if psxview showed a process as False under a category while True under another. Now I understand where in memory psxview is looking at for the processes and what it means if it shows in one place and not another. Additionally, based on the Windows internals knowledge passed in the class I understand why some processes will show “False” under normal circumstances.
 

To list off some of the topics covered:
 
OS Internals, Intel/AMD Architecture
Memory Acquisition
Data Structures in Memory
Windows Memory Analysis
Process Analysis
Threads and Handles analysis
Code Injection
Analyzing API Hooks
Windows Services
Networking
Kernel Analyis
Registry Analysis
Truecrypt
Timelines
Etc.
 
While this is just a short listing of the topics that are covered, you are probably already starting to see how the class is much more than just a “running volatility” class. 
 

Labs

In a technical class like this, the labs are of similar value as the course materials. In this class the labs took up about 25% of the class time. Structured like most classes, the labs reinforced the topics that were discussed in a specific module. To give you an example of what you can expect out of a lab:
You have been given a memory image of a machine that was believed to be infected with a keylogger. You must answer the following questions to determine the activity of the keylogger and its potential effects on the user.
 
1. Which process is suspicious and why?
2. Which file were keystrokes logged to?
3. What persistence mechanism was used by the keylogger?
4. Which aspects of the keylogger are modular? Hint: modularity is often accomplished by using DLLs exchanged without changing the main executable file.
5. What data was recorded by the keylogger on the infected computer? Hint: look at process memory. Is the data encoded? If so, can you decode it?
6. Which companies were targeted by the keylogger?
7. Which websites were visited, but filtered out by the keylogger?
8. (Bonus) How did the keylogger gain access to each keystroke?”
As you can probably tell from the example, the labs are realistic and ask the questions you would probably be focusing on if you came across the scenario in a case. I found all of the labs to be challenging and very rewarding. I have to admit there were a couple of labs that I needed to look at the answer guide for some help, but for the most part, while the labs were hard I was able to work my way through them. After each lab, the instructors would walk the class through a couple of methods to solve each of the questions. I found this particularly useful, as it allowed me to see several approaches to attack each type of problem. There was rarely a case where I arrived at the answers in the same exact way the instructors did.
  

Instructors

I have been in plenty of classes where I felt that the instructors did not know the material well enough to adequately teach it. This class does not suffer from the problem at all. The instructors for the course are the developers on the Volatility project, but their credentials don’t end there. The three instructors for the class I attended were Michael Ligh (@iMHLv2), Andrew Case (@attrc), Jamie Levy (@gleeda). As most of you probably already know, all three of these instructors are prominent figures in the Information Security community, especially when it comes to Malware Analysis, Forensics, and Incident Response. There was not a single question asked in the class that they were not able to answer, and trust me when I say there were a few questions especially from @xabean that I thought were going to be pretty rough to answer.  The amount of knowledge they share between the three of them is truly intimidating. 
 

Extras

As if the training wasn’t enough, the Volatility Team hands out a few extra goodies that you should probably be aware of as well. Some of this is stuff that is already out publically while others are only available to students of the class.
 
Access to unreleased (as of yet) code and plugins
A lab guide with answers. I already find myself using this while doing memory analysis, looking back to how I solved a particular problem in the class.
A memory analysis checklist. Includes items such as “On Vista+, lsass.exe and services.exe parent should be wininit.exe (all in %system%)”
A map of all the Volatility plugins
Memscan – A python wrapper for volatility that applies some of the logic learned in the class automatically to call out suspicious items in a memory dump
Various scripts including a script to mbr parser created by (@gleeda)
A USB flash drive with all the extras on it
A certificate of competition (40 CPE’s)
A binder of all the slides from the class (over 1,000 pages).
A prebuilt VM ready to roll for the labs
 

Conclusion

So as you can probably imagine by now, I highly recommend this class to anyone prepared for it. With a price lower than most SANS courses, this class is well worth the money and time spent on it. I can say my value as an Incident Responder increased drastically by taking this course. Keep an eye out for future posts where I plan to go over some plugins I am working on, as well as go over some analysis of memory samples. If you have a memory sample you want me to use for a walkthrough, feel free to reach out to me (@TekDefense).


Tuesday
Apr302013

Tektip ep28 - CrowdInspect by CrowdStrike

In this episode of TekTip we delve into a free tool put out by CrowdStrike called CrowdInspect. CrowdInspect is a Windows utility that will display processes and connections on a machine while providing some initial analysis to determine if the process or traffic may be malicious. CrowdStrike utilizes external resources such as VirusTotal, WOT, and the Malware Hash Repository to assist in determine maliciousness.