The Extensibility of Automater
With the recent release of version 2.0 of Automater, we hoped to significantly save some of your time by being able to use the tool as a sort of one-stop-shop for that first stage of analysis. The code as provided on GitHub will certainly accomplish that, since we have provided the ability for the tool to utilize sites such as virustotal, robtex, alienvault, ipvoid, threatexpert and a slew of others. However, our goal was to make this tool more of a framework for you to modify based on you or your team’s needs. 1aN0rmus posted a video (audio is really ow ... sorry) on that capability, but we wanted to provide an article on the functionality to help you get the tool working based on your requirements.
One of the steps in the version upgrade was to ensure the Python code was easily modified if necessary, but truthfully our hope was to create the tool so that no modification to the code would be required. To accomplish this, we provided an XML configuration file called sites.xml with the release. We utilized XML because we thought it was a relatively universal file format that was easily understood, that could also be utilized for future web-based application of the tool. When creating the file, we made the layout purposefully simple and flat so that no major knowledge of XML was required. The following will discuss sites.xml manipulation where we will assume a new requirement for whois information.
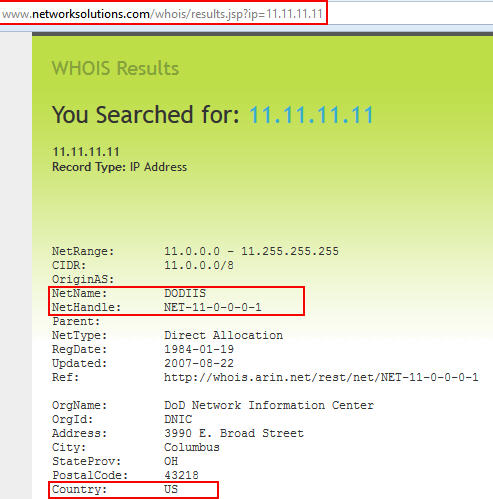
Our scenario will be wrapped around the networksolutions.com site where we will gather a few things from their whois discovery tool. Our first step is to look in detail at the site and discover what we want to find from it when we run Automater. In this case, we determine that we want to retrieve the NetName, NetHandle, and Country that the tool lists based on the target we are researching. Notice also that we need to get the full URL that is required for our discovery, to include any querystrings etc…
Now that we know what we want to find each time we run Automater, all we have to do is create some regular expressions to find the information when the tool retrieves the site. I left the regexs purposely loose for readability here. See our various tutorials on Regex if you would like to learn more. In this case, we will use:
• NetName\:\s+.+
• NetHandle\:\s+.+
• Country\:\s+.+
which will grab the NetName, NetHandle, and Country labels as well as the information reported on the site. The more restrictive your regex is, the better your results will be. This is just an example, but once you have the regex you need to get the information you desire, you are ready to modify the sites.xml file and start pulling the new data.
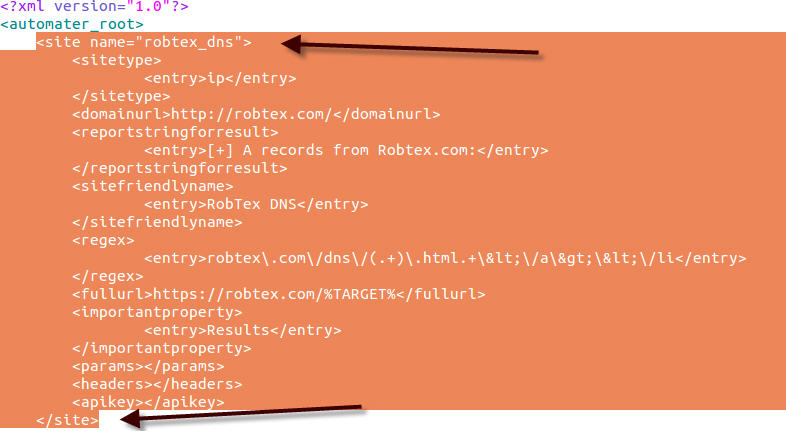
Our first step will be to add a new XML <site> element by simply copying and pasting an entire <site> within the current sites.xml file. Since we need to add a new site to discover, we can easily just copy and paste an already established entry to utilize as a skeleton to work with. Just copy and paste from a <site> element entry to a closing </site> element. Since you’re adding the site, you can place it anywhere in the file, but in our case we will put it at the top of the file.
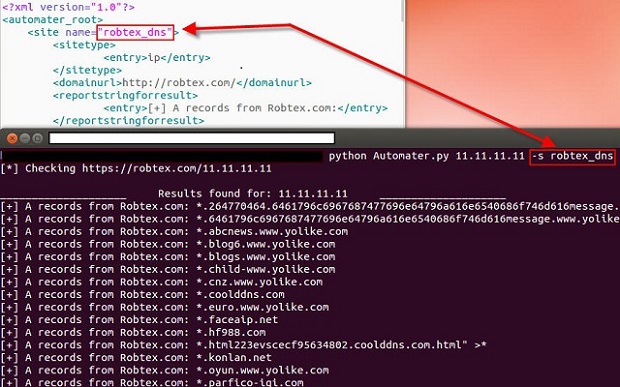
Once this is done, we need to modify the new entry with the changes that we currently know. Let’s come up with a common name that we can use. The <site> element’s “name” parameter is what the tool utilizes to find a specific site. This is what the tool uses when we send in the –s argument to the Automater program. For instance, let’s run python Automater.py 11.11.11.11 –s robtex_dns. Here you can see that Automater used the ip address 11.11.11.11 as the target, but it only did discovery on the robtex.com website. This was accomplished by using the –s parameter with the friendly name parameter.
We will use ns_whois for our friendly name and will continue to make modifications to our sites.xml file. We know that this site uses IP addresses as targets, so it will be an ip sitetype. A legal entry for the <sitetype> XML element is one of ip, md5, or hostname. If a site can be used for more than one of these, you can list extras in each <entry> XML element. (You can see an example of this in use in the standard sites.xml file in the Fortinet categorization site entry.) We also know that the parent domain URL is http://networksolutions.com. The <domainurl> XML element is not functionally used, but will be in later versions, so just list the parent domain URL. With this information, we can modify quite a bit of our file as shown.

Now let’s move down the file to the regex entries since we know this information, as well as the Full URL information. In the <regex> XML element, we list one regex per <entry> XML element. In this case, we want to find three separate pieces of information with our already defined regex definitions so we will have three <entry> elements within our <regex> element. We also know our Full URL information based on the networksolutions site we visited and this information is placed in the <fullurl> XML element. However, we can’t list the ip address as we found in the Full URL information because that would not allow the tool to change the target based on your requirements. Therefore whenever a target IP address, MD5 hash or hostname is needed in a querystring, or within any post data, you must use the keyword %TARGET%. Automater will replace this text with the target required – in this case 11.11.11.11. Now we have the Full URL and regex entries of:
• http://www.networksolutions.com/whois/results.jsp?ip=%TARGET%
• NetName\:\s+.+
• NetHandle\:\s+.+
• Country\:\s+.+
A requirement of Automater is that the <reportstringforresult>, <sitefriendlyname> and <importantproperty> XML elements have the same number of <entry> elements as our <regex> XML elements – which in this case is three. This “same number of <entry> elements” requirement is true for all sites other than a site requiring a certain post. I will post another document discussing that later. For now, we will just copy the current reportstringforresult, sitefriendlyname, and importantproperty entries a couple of times and leave the current information there so you can see what happens. Then we’ll modify that based on your assumed requirements.
Our new site entry in the sites.xml file currently looks like the following:

Here you can see the use of the %TARGET% keyword in the <fullurl> element as well as the new <regex> element regex entries. You can also see that I just copied the <sitefriendlyname> and <reportstringforresult> element information from the robtex entry that we copied and pasted. We did the same for the <importantproperty> XML element, but the entries here will be “Results” most of the time. I will post more on what this field allows later. Let’s take a look at running Automater with the current information in the sites.xml file and ensure we only use the networksolutions site by using the –s argument as before with the new ns_whois friendly name as the argument. Our call will be:
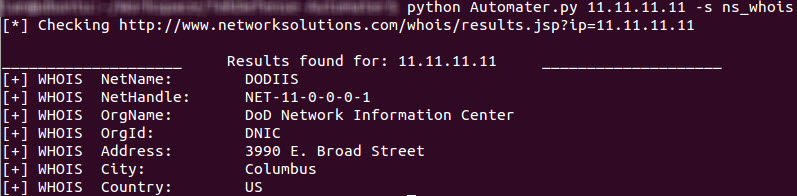
python Automater.py 11.11.11.11 –s ns_whois
Once we run this command we receive the following information:
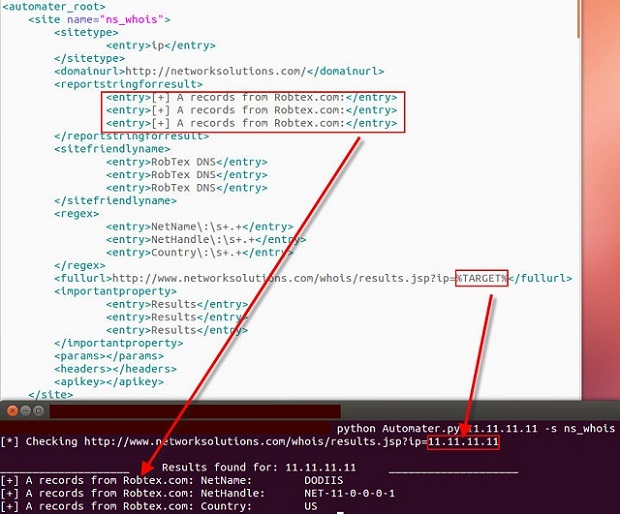
Notice that the <reportstringforresult> element is shown with the report string. Also notice the %TARGET% keyword has been replaced with the target address. Now we need to change the <reportstringforresult> element so that we can get a better report string for each entry. In this case, we will change the report strings to [+] WHOIS for each entry just to show the change. We will also change the <sitefriendlyname> element to NetName, NetHandle, and Country so that they are correct. The <sitefriendlyname> element is used in the other reporting capabilities (web and csv). I will post something on that later as well. For now change your sites.xml <reportstringforresult> entries and then see what your report looks like! Should look something like the following screenshot, except that in my case I have also added a few more <entry>'s.
Hopefully this helps you understand how extensible the Automater application is now. Simple modifications to the sites.xml will give you the ability to collect massive information from multiple sites based on what you or your team needs with no Python changes required. Let us know.
 Admin
Admin
Reader Comments