Our friends over at BruteForce Labs decided to give us all a little present this holiday season. As I have spoke about on TekTip episodes in the past, BruteForce Labs has been working on a distro that combines many of the different honeypot projects and their addon modules. As Backtrack is to offense, and The Security Onion is to defense, HoneyDrive is the premiere honeypot distro.
HoneyDrive includes and is configured to run the following honeypots out of the box:
- Kippo: Medium interaction SSH honeypot. Includes Kippo-Graph and Kippo2MySQL.
- Honeyd: Low interaction flexible honeypot. Includes Honeyd2MySQL and Honeyd-Viz
- Dionaea: Honeypot designed to collect malware and exploits.
- Misc Honeypots: Sticky honeypot, Tiny honeypot, IIS Emulator (for Honeyd), InetSim, and SimH.
In addition to the honeypot software Honeydrive also includes a suite of tools for analysis, forensics, monitoring, and reverse engineering. Included in this list is our own tool Automater!. Some of the other tools are:
- ntop
- p0f
- EtherApe
- nmap
- DFF
- Wireshark
- ClamAV
- ettercap
- Automater
- UPX
- pdftk
- Flasm
- pdf-parser
- Pyew
- dex2ja
As if this wasn't enough HoneyDrive also includes a few extra tools, utilities, and addons, and scripts that will assist users with maintaining the system.
While I will not go over each tool, at least not in this post I will hit up the major features.
Installation: Ease of use, and configuration is so important when bringing highly technical tools like this into one arsenal. Many of you have probably already attempted to create your own honeypot using some of this software before. If your experiences were anything like mine there was most likely a bit of cursing and frustration involved. Especially as you introduce addons and extensions for these tools. HoneyDrive is very simple to install and works mostly without any extra configuration. To install simply download the .ova from the HoneyDrive Sourceforge page. If you are using Virtualbox, simply doubleclick the .ova once downloaded to launch the virtual machine importer for HoneyDrive. The VM should import without issue.
*I should note that I had to change the network settings when I imported to utilize a different interface than the default.
After the import simply startup the VM and you will be able to login with the credentials provided in the readme.
Using Kippo:
As I have already done a TekTip episode on Kippo I will spare you all the gory details of the product and instead point you to the video. I will be skipping the replay functionality mostly. Kippo is one of the most automated honeypots in the distro. It requires very little interaction to get it working.
It is important to know where all the files reside in this distro in relation to Kippo. From the readme:
[Kippo]
Start: /opt/kippo/start.sh
Downloads: /opt/kippo/dl/
TTY logs: /opt/kippo/log/tty/
Credentials: /opt/kippo/data/userdb.txt
MySQL database: kippo
MySQL user/password: root/honeydrive
[Kippo-Graph]
Location: /var/www/kippo-graph/
Config: /var/www/kippo-graph/config.php
URL: http://local-or-remote-IP-address/kippo-graph/
MySQL database: kippo
MySQL user/password: root/honeydrive
[Kippo2MySQL]
Location: /opt/kippo2mysql/
MySQL database: kippo2mysql
MySQL user/password: root/honeydrive
To start kippo, open a terminal and navigate to /opt/kippo/ and run start.sh
cd /opt/kippo/
./start.sh
That is it! You are now running an SSH honeypot. Again I am skipping a lot of details on what Kippo is but you can go to my video to see the full info.
Now before showing the visualization features, I need to generate some SSH traffic to that honeypot. I did this manually, from a few other machines.
*Remember the default password is 123456 for Kippo.
Once some traffic has occurred either via actual connections to your honeypot or simulated ones from yourself open a web browser and navigate to http://localhost/kippo-graph/ on your VM. Here you will need to click on the text that states "GENERATE_THE_KIPPO_GRAPHS". This will manually pull the data that was already imported into mysql from your kippo logs and display them in graphs that help tell a visual story of connections.
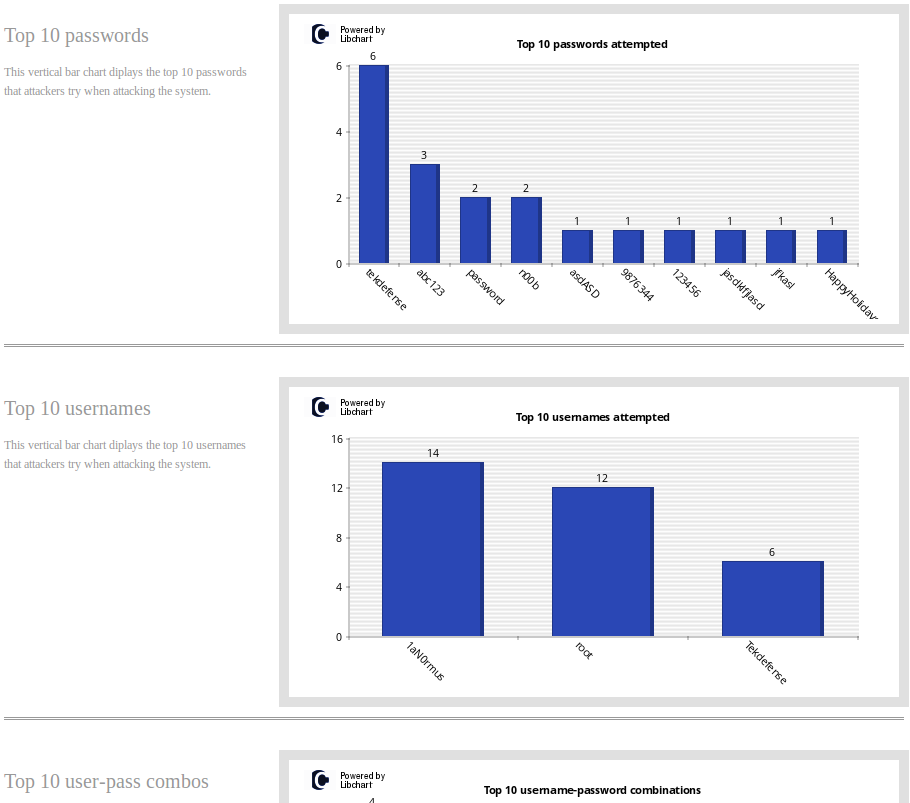
These graphs will show statistics on passwords, usernames, inputs, connections, and many other details. This distro would be will worth the time spent on it just to have Kippo pre-installed and configured to work with Kippo-Graph, but that is only one feature.
Using Honeyd:
Honeyd is a flexible low interaction honeypot. Created by Niels Provos (currently employed by Google), honeyd can be used to emulate a myraid of services and machines. With Honeyd you can create templates of behaviors for machines and then deploy numerous instances of these templates on a single machine effectively emulating a full network.
Honeyd takes a little more work than Kippo to get running properly on this distro, but it is still much better than getting it functioning on your own. Like Kippo it is best to start off with where the important files reside:
[Honeyd]
Bin: /usr/bin/honeyd, + /usr/bin/honeydstats
Config: /etc/honeypot/
Scripts: /usr/share/honeyd/scripts/
Logs: /var/log/honeypot/
[Honeyd2MySQL]
Location: /opt/honeyd2mysql/
MySQL database: honey2mysql
MySQL user/password: root/honeydrive
[Honeyd-Viz]
Location: /var/www/honeyd-viz/
Config: /var/www/honeyd-viz/config.php
URL: http://local-or-remote-IP-address/honeyd-viz/
MySQL database: honeyd2mysql
MySQL user/password: root/honeydrive
[Honeyd-Scripts]
Location: /opt/honeyd-scripts/
+ honeyd-geoip
+ honeyd-geoip-cymru
The first step to getting honeyd up and running is with the configuration file. Here is where you will want to setup your templates and bindings. By default the config will bind to 10.x.x.x addresses. That may work for some of you, but I wanted it to leverage DHCP. To do this, you have to ensure that you have the template machine bind with a MAC that is not the same as the Honeydrive box. Here is my basic config:
create default
set default default tcp action block
set default default UDP action block
set default default ICMP action block
create windows
set windows personality "Microsoft Windows XP Professional SP1"
set default tcp action reset
set windows ethernet "73:D5:DF:84:5A:17"
add windows tcp port 135 open
add windows tcp port 139 open
add windows tcp port 445 open
add windows tcp port 21 open
dhcp windows on eth0
Once you have the config set the way you want run honeyd:
sudo honeyd -d -f /etc/honeypot.conf -l /var/log/honeypot/honeyd.log
Be sure you log to that exact path and file. If you do not you will need to modify the honeyd2mysql.pl script to look at where you have the logs going. I used the -d above inorder to be able to troubleshoot, if you leave the -d out honeyd will run in the background.
Now that honeyd is up and running, generate some scan activty so the log has something in it. An nmap scan will work fine.
While Kippo transfers the logs to MySQL automatically, honeyd does not, as far as I can tell (perhaps I am doing something wrong). So we must run the honeyd2mysql script.
cd /opt/honeyd2mysql/
./honeyd2mysql.pl
Now we can generate graphs just as we did with kippo.
Open a web browser and connect to http://localhost/Honeyd-viz/index.php. Click on the link that states "GENERATE_THEHONEYD_GRAPHS". This will now create graphs from the data we imported into MySQL.
Dionaea:
Dionaea is a honeypot designed to collect malware and exploits. It does this by emulating services and collecting what the attacker or malicious software sends their way. The Malware Analyst's Cookbook does a great write up on this honeypot that you should check out if you haven't already. As with the others lets check out the useful files:
[Dionaea]
Location: /opt/dionaea/
Bin: /opt/dionaea/bin/dionaea
Config: /opt/dionaea/etc/dionaea/dionaea.conf
Logs: /opt/dionaea/var/log/
SQLite database: /opt/dionaea/var/dionaea/logsql.sqlite
Malware samples: /opt/dionaea/var/dionaea/binaries/
+ phpLiteAdmin: /var/www/phpliteadmin,
+ password: honeydrive,
+ URL: http://localhost/phpliteadmin/phpliteadmin.php
[Dionaea-Scripts]
Location: /opt/dionaea-scripts/
+ mimic-nepstats
+ dionaea-sqlquery
Like with the other honeypots, you need to take a look at the config and ensure it meets your needs. The default worked for me. Once the config is ready simply run dionaea. If you want to test that it is working just fire up Metasploit on another OS and send some exploits at dionaea. Phplite is included and configured by default.
LaBrea:
Labrea is part IDS and part sticky honeypot. Now some of you are probably asking, "What the heck is a sticky honeypot?". So a sticky honeypot or tarpit is used to slow down attackers as they reach the honeypot. To learn more about how it works and why to use it checkout http://labrea.sourceforge.net/Intro-History.html
[LaBrea]
Bin: /usr/sbin/labrea
Config: /etc/labrea/labrea.conf
Before running Labrea be sure to read the Labrea readme. Labrea has the potential to cause issues on your network if it is not configured and run properly. For those who just want to rush in though, the following command from the Labrea FAQ will get you started. Be warned though.
labrea -z -s -o -b -p 10000 -i eth1
Tiny Honeypot:
Tiny Honeypot will listen on all TCP ports not currently in use and provide very limited responses back to attackers. The responses should be enough to trick most automated attack tools.
[Tiny Honeypot]
Bin: /usr/sbin/thpot
Config: /etc/thpot/thp.conf
Examples: /usr/share/doc/tinyhoneypot/examples/
Logs: /var/log/thpot/
In the config file you can modify what interface is used, and control what some of the responses are. To run Tiny Honeypot for a single service simple navigate to /usr/sbin and run the following:
sudo ./thpot ftp
Of course you can replace FTP with whatever service you want to put in. There is a lot more that can be done with Tiny Honeypot. Look in the examples directory and of course checkout the readme to find out more.
INetSim:
INetSim is a tool for simulating some common services. Back in one of the first TekTip video I showed INetSim and its use for malware analysis. For instance if we wanted malware to think it was talking to it's CnC (C2) server we could forward that traffic via some DNS (ApateDNS) manipulation to INetSim which would respond with enough data to hopefully fool our malware. The important files can be found at:
[INetSim]
Bin: /usr/bin/inetsim
Config: /etc/inetsim/inetsim.conf
Logs: /var/log/inetsim/
You can manipulate the config to fit your needs of course but INetSim will run with default configs just fine. Navigate to /usr/bin and run inetsim.
sudo ./inetsim
Example output once it is running is as such:
INetSim 1.2.3 (2012-10-01) by Matthias Eckert & Thomas Hungenberg
Main logfile '/var/log/inetsim/main.log' does not exist. Trying to create it...
Main logfile '/var/log/inetsim/main.log' successfully created.
Sub logfile '/var/log/inetsim/service.log' does not exist. Trying to create it...
Sub logfile '/var/log/inetsim/service.log' successfully created.
Debug logfile '/var/log/inetsim/debug.log' does not exist. Trying to create it...
Debug logfile '/var/log/inetsim/debug.log' successfully created.
Using log directory: /var/log/inetsim/
Using data directory: /var/lib/inetsim/
Using report directory: /var/log/inetsim/report/
Using configuration file: /etc/inetsim/inetsim.conf
Parsing configuration file.
Configuration file parsed successfully.
=== INetSim main process started (PID 2732) ===
Session ID: 2732
Listening on: 127.0.0.1
Real Date/Time: Fri Dec 28 21:38:19 2012
Fake Date/Time: Fri Dec 28 21:38:19 2012 (Delta: 0 seconds)
Forking services...
Couldn't create TCP socket: Address already in use at /usr/lib/perl5/Net/DNS/Nameserver.pm line 90
Net::DNS::Nameserver::new('Net::DNS::Nameserver', 'LocalAddr', 127.0.0.1, 'LocalPort', 53, 'ReplyHandler', 'CODE(0xa91215c)', 'Verbose', 0, ...) called at /usr/share/perl5/INetSim/DNS.pm line 37
INetSim::DNS::dns called at /usr/share/perl5/INetSim.pm line 74
INetSim::fork_services() called at /usr/share/perl5/INetSim.pm line 396
INetSim::main() called at ./inetsim line 22
Couldn't create UDP socket: Address already in use at /usr/lib/perl5/Net/DNS/Nameserver.pm line 109
Net::DNS::Nameserver::new('Net::DNS::Nameserver', 'LocalAddr', 127.0.0.1, 'LocalPort', 53, 'ReplyHandler', 'CODE(0xa91215c)', 'Verbose', 0, ...) called at /usr/share/perl5/INetSim/DNS.pm line 37
INetSim::DNS::dns called at /usr/share/perl5/INetSim.pm line 74
INetSim::fork_services() called at /usr/share/perl5/INetSim.pm line 396
INetSim::main() called at ./inetsim line 22
* dns_53_tcp_udp - failed!
* irc_6667_tcp - started (PID 2744)
* ntp_123_udp - started (PID 2745)
* ident_113_tcp - started (PID 2747)
* finger_79_tcp - started (PID 2746)
* tftp_69_udp - started (PID 2743)
* syslog_514_udp - started (PID 2748)
* echo_7_tcp - started (PID 2753)
* echo_7_udp - started (PID 2754)
* time_37_tcp - started (PID 2749)
* discard_9_udp - started (PID 2756)
* time_37_udp - started (PID 2750)
* chargen_19_tcp - started (PID 2759)
* daytime_13_tcp - started (PID 2751)
* pop3s_995_tcp - started (PID 2740)
* smtps_465_tcp - started (PID 2738)
* dummy_1_udp - started (PID 2762)
* smtp_25_tcp - started (PID 2737)
* discard_9_tcp - started (PID 2755)
* daytime_13_udp - started (PID 2752)
* quotd_17_tcp - started (PID 2757)
* chargen_19_udp - started (PID 2760)
* https_443_tcp - started (PID 2736)
* dummy_1_tcp - started (PID 2761)
* ftps_990_tcp - started (PID 2742)
* pop3_110_tcp - started (PID 2739)
* quotd_17_udp - started (PID 2758)
* http_80_tcp - failed!
* ftp_21_tcp - started (PID 2741)
done.
Simulation running.
Misc Tools:
As I mentioned previously in addition to the honeypots, there are many other tools included. Automater is of course one of those tools but there are many more. From the readme:
[Security/Forensics/Anti-Malware Tools]
EtherApe
PuTTY SSH Client
nmap, + Zenmap, Umit Network Scanner
Wireshark, + tshark
Vidalia
DNS Query Tool
ClamAV, + ClamTk
ettercap
htop
ntop, + "admin"
ngrep
p0f
Flawfinder
Automater
Netcat
VBinDiff
UPX
ssdeep
md5deep
pdftk
Flasm
dex2jar
DFF (Digital Forensics Framework)
DNSpenTest
pdf-parser
NASM
Dissy
HT Editor
shellcode2exe
Pyew, + Bokken GUI
[Firefox Add-ons]
Firebug
NoScript
Adblock Plus
JavaScript Deobfuscator
[Extra Software]
Furius ISO Mount
GParted
gedit
Parcellite
Shutter
Terminator
VYM - View Your Mind
WebHTTrack Website Copier
UNetbootin
RecordMyDesktop
VLC media player
gURLChecker
Xpdf
Conclusion:
Honeydrive 0.1 is a great start to a promising distro. It includes most of the major honeypot software. The suite of tools should allow users a very flexible solution that can adapt to fit home, lab, and even production networks. Adding a few more tools and automating the startup of the rest will help a lot with users who have not dealt with these tools in the past. As the community for this distro grows I would expect documentation on the software to grow which of course will help us all. Expect to see a video format of this review on this Sundays edition of TekTip.
-1aN0rmus (1aN0rmus@TekDefense.com)
 Honeydrive,